Showing posts with label Settings. Show all posts

Thursday, 21 July 2016

Remove dir="ltr" trbidi="on" from Blogger Posts

Updated on: July 21, 2016
Remove dir=
How to remove default code dir ltr trbidi on from blogger
All of you create posts in blogger, but have you ever notice that whenever you create a new post blogger by default add code <div dir="ltr" style="text-align: left;" trbidi="on"> at the top/starting of your blog post (in post HTML). Now the questions are, Why blogger automatically adds that piece of code in your posts? What is the use of that code? Can we remove that code? What happen if we remove that code?

Actually the "ltr" and "trbidi" settings are used by blogger to support both "ltr" and "rtl" justified languages. This piece of code helps your readers to read translated Arabic, Syriac and Mandaean (or rtl) languages properly on your blog. This code is not necessary and you can remove this code from your post.
PROS :-
  • Make your post code clean and tidy.
  • Remove override CSS code style="text-align: left;".
  • Your readers can still translate your page by using tools like Google translator.
  • You can reverse the setting at any time (default setting).
CONS :-
  • Your blog can no more support translated "rtl" languages.
In 2015 blogger have officially provided the option to remove <div dir="ltr" style="text-align: left;" trbidi="on"> from posts with blogger setting. Yes! now it is so easy to remove the above code with only 3 easy simple steps.

How to Remove the code dir="ltr" trbidi="on" from all posts

Step 1. Login to your blogger account, then navigate to Settings > Language and formatting.
Step 2. In the section "Enable transliteration" select disabled.
How to disable ltr and trbidi setting in blogger
Step 3. Click Save settings.
Note: The code will no longer exist whenever you create new post but you have to manually edit the post HTML to remove code from already published posts.
That's all!
Refresh your blog posts list and create a new post. Switch to HTML, and you will find no such code in your blog. Don't thank me, thank blogger for giving us control. For any issues related to above Tutorial Please Comment Below. Stay Updated, Browse Howbloggerz! :)
Read more ...

Tuesday, 19 July 2016

Search Results "Sort By Date" Order in Blogspot

Updated on: July 20, 2016
How to set Sort by date as default sorting order in blogger
How to set default order for search result

We have already discussed that Search is the necessary part of the blog/blogspot and whenever your users make search over it the resultant page shows results sorted by relevance for the give query for example:

Showing posts sorted by relevance for query sample. Sort by date Show all posts

Many of you want to change the order and would like to set "Sort By Date" as the default sorting order not "Sort by Relevance" so that your viewers can see your latest posts first without clicking on link each time to change the order. This method works only with 3rd party search boxes. Follow the given steps carefully.

How To Set "Sort By Date" As Default Sorting Order

Step 1. Login to your Blogger account, then navigate to your 3rd party Search Box code.

For example:

<form action="/search" method="get">
<input type="text" name="q" placeholder="Type Here..."/>
<input type="hidden" name="max-results" value="8"/>
<input type="submit" value="Search" />
</form>

Note: The above code may vary.

Step 2. Find the code </form> and paste the following code just above it.

<input name="by-date" type="hidden" value="true"/>

For Example:

<form action="/search" method="get">
<input type="text" name="q" placeholder="Type Here..."/>
<input type="hidden" name="max-results" value="8"/>
<input type="submit" value="Search" />
<input name="by-date" type="hidden" value="true"/>
</form>

Step 3. Save your code.

Read: How to Change Status message on search result page

Enjoy!

Jump into your blog and make a search. Wait! What? your search result is sorted by date not by relevance. Remember code may vary according to your search box, if the above tutorial doesn't work for you don't worry - comment below. Stay Updated, Browse Howbloggerz ! :)

Read more ...

Thursday, 19 May 2016

How to Change Blogger Email address (with Images)

Blogger does not provide option to change primary email id and so many blogger user asking "how to change my blogger email address" with different reasons, chosen a wrong blogger email address at the time of creating a blogspot blog is one of the top reason but if you are also looking to change your blogspot login email address with any reason then you are at right place.
how to change blogger email address with images

Now days their are too many different ways to change blogger account email id but don't worry i have come with easy one, i have created an article on the best and easiest way to change your email address on blogger including step by step instructions (with images):

Changing Blogger Login Email Address


Step 1. Login to your blogger account for which you want to change your login email id.

Step 2. Now navigate to Blogger Dashboard > Settings > Basics > Permissions section.

Step 3. Click + Add authors and send an author invitation to your new email id.

adding author to blogger to change email id


Step 4. Go and Accept the author invitation in your new email address and again login to blogger with old email id.

Step 5. Again navigate to Permissions section. You will see another author in Permissions section. Change the role of new email id from Author to Admin.

changing page role to change blogger email


Step 6. Now login to blogger with your new email address. You will see your blog in dashboard.

Step 7. Go to Settings > Basic > Permission section and remove your old email address from the Blog Authors.

removing old blogger email address

That's it!


You have successfully changed your blogspot email address with new email id. For any issues related to above tutorial comment below. Stay Updated, Browse Howbloggerz ! :)
Read more ...

Monday, 18 April 2016

How To Change Email Subscription Delivery Time For Blogger

If you were looking to change your google blogger feedburner email subscription delivery time for blog updates or To send recent / latest / newly published posts into yours followers inbox immediately or after few hours or Want To manage the auto-send email setting to prevent delay of day or several hours in email receiving or to receive posts email updates from your blog in real-time or To solve any other issue related to posts delivery schedule via email. Follow the below given step by step tutorial with images :
how to change Email subscription delivery time blogger

Steps: To Change Email Subscription Delivery Time


feedburner logo


Step 1. Go to Feedburner, Login with your blogger account > Select your blog.


Feedburner dashboard


Step 2. Then navigate to Publicize > Email Subscriptions > Delivery Options.


Changing email delivery time blogger


Step 3. Change the setting and then Click Save.

Some Tips :

  1. Make sure your the time in your Blogger settings is in YOUR time zone. This will throw the delivery timing off if it isn’t.
  2. Make sure when you schedule a blog that is timed BEFORE the scheduled Email Delivery time in Feedburner.
  3. This screen is also where you can DEACTIVATE sending emails from Feedburner all together if you still want to keep your account active but just want to stop email service.
  4. The setting to schedule delivery of new posts to email subscribers does not allow for immediate delivery, but asks you to choose a two hour window. Therefore you can schedule/publish your post few hours before delivery time to deliver it faster.

That's it

Now your subscribers will receive posts updates via email in your scheduled time. For any issues related to above tutorial comment below. Stay Updated, Browse Howbloggerz ! :)
Read more ...

Thursday, 14 April 2016

Show At Most Posts Setting Not Working In Blogger

Many users were facing problems related to topic ' The older posts were missing from their blog homepage but they were actually not deleted and still exist in posts list ' or ' The number of posts per page were not matching up with the setting of number of posts per page or that should be shown and missing posts were shown in link "older posts" ' or ' The number of posts on main page / Show at most posts on the main page setting is not Saving properly.

Posts per page not working or saving properly

These problem were caused due to the large length of posts in your blog due to which blogger was not able to set preferred numbers of posts per page ( Approx limit  155,000 characters / page for posts ). and therefore shifts your posts to next page ( Older Posts link ).

To solve this problem Problem you need to add Jump Break in each post to summaries your posts by maintaining the length your posts without shorting / editing posts. This will add link to full post after few defined lines.

To learn to add jump break follow the given step by step tutorial with images :

Steps : How To Add Jump Break


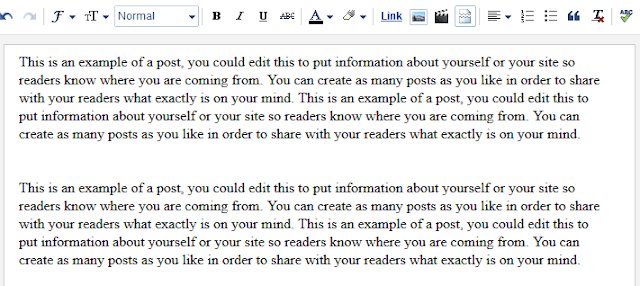
Step 1. Login to your Blogger account, then click on New Post or Open existing post.

creating new post in blogger


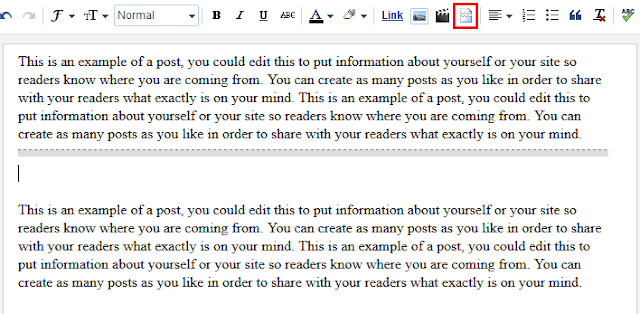
Step 2. After few lines ( Summary of post ) insert jump break using Blogger Post editor.


adding jump breaks in blogger posts


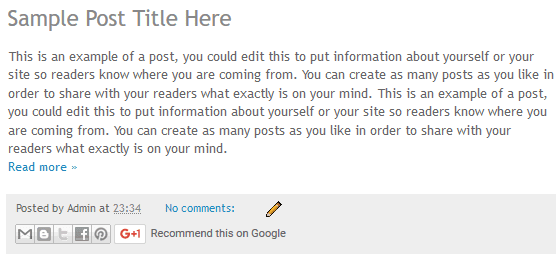
Step 3. Click publish / Update.


Post Preview after adding Jump Break


That's all


Now you can add Jump Breaks in each post either new or old which will also solve the above given problems. For any issues related to above tutorial comment below. Stay Updated, Browse Howbloggerz ! :)
Read more ...