Showing posts with label SEO. Show all posts

Thursday, 15 December 2016

How to Submit Blogger Sitemap to Search Console

Updated on: December 15, 2016
It was already discussed How to create account for your blog in Google Search Console. After creating your Google Search Console account you need to add your blog sitemap in it so that all of your blog posts can be indexed by google in search results for relevant queries. Moreover you can manage which post to show and which not in the results and more.


Submit blogspot sitemap to google webmaster tools

What is Sitemap?


According to Wikipedia The Sitemaps protocol allows a webmaster to inform search engines about URLs on a website that are available for crawling. A Sitemap is an XML file that lists the URLs for a site. It allows webmasters to include additional information about each URL: when it was last updated, how often it changes, and how important it is in relation to other URLs in the site. This allows search engines to crawl the site more intelligently. Sitemaps are a URL inclusion protocol and complement robots.txt, a URL exclusion protocol.

How to add your blogger sitemap in search console

Many other tutorial website may suggest you to add sitemap using RSS URL which is messy, complex and of large size because before few years back blogger blogs doesn't have their sitemap xml file that's why many users use RSS/ATOM to serve as sitemap but recently blogger started providing sitemap xml file which is attached to each blogger blog. Moreover official blogger sitemap file is small in size, easy to understand and updated instantly with addition of new posts.
Step 1. Open your Search console account.
Step 2. Navigate to Crawl > Sitemaps > ADD/TEST SITEMAP.
Adding blogger sitemap to Google Search Console
Step 3. Add sitemap.xml and click submit.
How to submit your blog xml sitemap file
UP!
Suggestion: In similar way you can submit your blog sitemap to Bing webmasters and others
Your blog posts will start getting indexed in google results soon. For any issues related to above Tutorial Please Comment Below. Stay Updated, Browse Howbloggerz ! :)
Read more ...

How to Add Your Blog in Google Search Console

Updated on: December 15, 2016
Google Search Console (earlier known as Google Webmaster tools) is a collection of online professional web tools provided by google for free. GSC help you to manage your website for google search results. GSC include features like Search appearance, Search traffic analytic, error checking, website improvement suggestions and so more.

How to Attach Your Blog in Google Search Console
Step 1. Go-to https://www.google.com/webmasters/tools and then login with your google account.
Step 2. Enter your blog address in the given area.
  • For Custom domain users: http://www.example.com you can also use https instead of http if you have purchased SSL from your domain registrar.
  • For Normal blogger users: http://www.example.blogspot.com you can also use https instead of http because blogger provide SSL for its sub-domains free of cost.
Submit your Blog on Google Search Console
Note: If your are using https make sure https redirect is 'on' in Settings > Basic > HTTPS
Step 3. If you have used same google account to login in search console that was linked with blogger account then your blog will automatically get verified.
Add Your blogspot on webmaster tools
Step 4. Click on "Not now".
Note: If you didn't get verified as an owner of website then you can use alternative given methods.
Read: How to Add Sitemap in Google Search Console using Official sitemap URL.
Awesome!
Now you have successfully created your Search console account and have attached your blog with it. For any issues related to above Tutorial Please Comment Below. Stay Updated, Browse Howbloggerz ! :)
Read more ...

Monday, 13 June 2016

5 Ways To Reduce Blogger Page Load Time

Ways To Reduce Blogger Page Load Time
Time is now google ranking factorThe adage “patience is a virtue” doesn’t apply online. Even a one-second delay can drastically reduce pageviews, customer satisfaction and your lovely revenue. Actually, it’s not a secret at all, Page load time have long played a role in search engine rankings. Since 2010, Google has been accounting for a site speed in its algorithm for ranking. So what’s the biggest factor contributing to your page speed? - It takes browsers time to download the resource code that makes up your page. It has to download your HTML, your stylesheets, your scripts and your images. Each new feature weighs down your blogger blog just a little more.

Did you know that if an e-commerce site is making $100,000 per day, a delay of 1 second in page load time can cost it an annual loss of $2.5 million. Research also shows that 47% of the readers expect that the websites should load within 2 seconds while a delay of more than 3 seconds can make 40% of your readers to abandon your site and I know you don't want to lose your users - that's why you're here :)

Of course, a quick search on how to improve page load time turns up so many techniques. Minify CSS? JavaScript at bottom? but no specific instructions for blogger blogs BUT don't worry, I have prepared a list of ways for blogspot users, implementing these changes dramatically improve your page load time, even if you aren’t a total technical programmer. In this article, we’ll use both basic and advanced techniques you can use to optimize your blogger page load time.


Ways To Improve Blogger Page Load Time


#1 - Optimize your images:

Others ways may help you to reduce the page size in bytes, but image size can dramatically increase or decrease your page size in kilobytes (KB) and we have already discussed that More Page size = More page load time. Therefore Image size was the most important factor in page load time. Many times we upload images to increase the visual appeal of the posts, therefore its become important to optimize the images. As Blogger by default doesn't optimize the images we upload, so we have to optimize the images before uploading.

  • Use online image compressing tool like TingpngImageOptimizer  to optimize images without compromising with image quality.
  • Crop your images to the correct size. For Example: If your main page width is 600px, resize the image to that width. Don’t just upload a 2000px-wide image and set the width parameter (width=”600”). This slows your page load time and creates a bad user experience.

Recommended: Use JPEG or PNG Image format, though all browsers fully support them.


#2 - Reduce numbers of posts on your homepage:

Homepage was the most important page in the blog, it's like first impression and we know "First impression matters". Homepage itself speak all about your blog, most of the users use your homepage for navigation purpose. According to a study, 90% of the visitor consider homepage as important factor for blog quality. If your homepage is visually appealing but slow in loading, 55% of the user may abondon your blog. Even if your writing quality content. Therefore by reducing the numbers of posts per page, we can dramatically improve homepage load time of our blogspot blog.

- Goto Settings > Posts, comments and sharing > Change "Show at most" value.
- Click Save.

Recommended: show at most 6-8 posts on homepage.

Read: Stylish Search Boxes with limited number of posts per page.


#3 - Reduce numbers of Widgets

Adding widgets was a cool feature in blogger and blogger lets you add as many widgets as you want. But remember, adding too many widgets can increase HTTP requests which effects your page load time very badly. Therefore always use limited numbers of widgets on your blog.

  • Remove unwanted and non-essential widgets.
  • Use at max 5 widgets on a page.
  • Create page instead of widget (but should be relevant). For Example: You can create contact page instead of adding contact widget.
  • Show or Hide widgets on Specific page.


#4 - Minify JavaScripts and CSS

Compressing (Minify) your code is also useful for interpreted languages that run over the Internet, such as CSS and JavaScript. It reduces the the size of the file (code) without harming your code. SORRY to say again that "More page size = More page load time".

Before we move further, its important to learn more about the benefits of External source code. If the code is External, it can easier be cached by browsers. (Cached means: Your file will be downloaded once and can be executed many time, through out the blog without downloading again and again). Of course this will optimize your page load time :)

  • Convert inline JavaScript to External JavaScript, then minify them and place at the end (same as #5).
  • Convert inline CSS to External file, then compress the code.

Read: How to Convert Inline JavaScript to External file in blogger

To minify CSS, try CSScompressor. To minify Javascript, try Javascript-Compressor.

How to Minify CSS and JavaScript:

1. Copy and paste your CSS or JavaScript in blank, input field.
2. Click Compress.
3. Again copy and paste your output code in your file, and save the file.

Note: Don't move CSS file at the end of body. (Optional) You can place CSS file above </head> tag.


#5 - Move JavaScripts at the Bottom

Pages always load from top to bottom and the code placed first in the HTML document, run first and so on. JavaScripts take few seconds to get fully executed and thereby increases the page load time, Therefore JavaScripts should be placed at the end of body so that important code can load first to display page faster.

Note: Don't move default, blogger JavaScripts. Important! Backup your templates before applying these options (If anything went wrong, you can revert it easily).

These options are only for custom features. For example: Custom Search Box, Custom Subscription box, Custom Lightbox for blogger etc.


- Move the Inline JavaScript code above </body> tag.

  For Example:
<script> Your code </script>
              or
<script type="text/javascript"> Your code </script>


- Also Place External JavaScript at the end.

  For Example:
<script src="http://javascript.js"/>
              or
<script src="http://javascript.js"></script>
              or
<script type="text/javascript" src="http://javascript.js"/>
              or
<script type="text/javascript" src="http://javascript.js"></script>

Steps: To move JavaScript at Bottom

1. Copy your JavaScript code with <script> ... </script> tag.
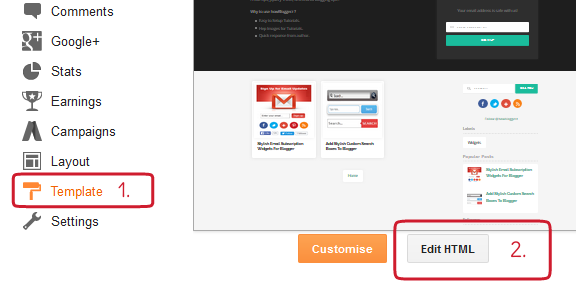
2. Login to blogger, then navigate to Dashboard > Template > Edit HTML.
3. Use ctrl+f and find code </body>.
4. Just above it place your JavaScript.
5. Click Save.


Finally, its over

Now, its time to check out the magic. Don't forget to  share your experience below. Stay Updated, Browse Howbloggerz ! :)
Read more ...

How To Convert Inline CSS or JavaScript To External File

CSS stands for Cascading Style Sheets. CSS describes how HTML elements are to be displayed on screen, paper, or in other media. CSS saves a lot of work. It can control the layout of multiple web pages all at once. JavaScript is an object-oriented computer programming language commonly used to create interactive effects within web browsers.

How To Convert Inline CSS or JavaScript To External File
What is inline CSS and JavaScript? All the CSS and JavaScript that are embedded in HTML document are know as inline CSS or JavaScript.

What is External CSS and JavaScript? All the CSS and JavaScript that are hosted externally as External file are known as External CSS or JavaScript.

Benefits of External CSS and JavaScript.

- Optimize Page load time.
- Makes HTML document lighter.
- Increases browser caching.
- Makes your document clean and tidy.
- Easy to manage.

How to Host Blogger CSS and JavaScript on google drive

There are so many file hosting services, but google drive is free and easy to manage. You can also use google drive for windows to quickly manage your files.

Step 1. Open Notepad > Paste your code (for CSS remove <style> and </style>, for JavaScript remove <script> and </script>.

Step 2. In the Notepad menu, select 'File' > 'Save as' and type the file name with extension .css for CSS and .js for JavaScript.


Preparing CSS and Javascript file to host online

Step 3. In the same window, choose "All files" in the "Save as type" option and set the Character Encoding to UTF-8.

Step 4. Open Google drive and login with your Gmail account. After you logged in, click on the 'NEW' button and add a new separate folder to upload your JavaScript and CSS files.


How to add folder in Google drive


Step 5. Open the newly created folder, and click on the NEW > File Upload. then choose the files that you need to upload.


How to upload file in google drive


Step 6. After the files have been successfully uploaded, right click on the file names and select 'Share'. Again in the pop-up select advance.


How to share file on google drive


 Step 7. Change file access from 'private' to 'Anyone'. Then copy your file link and click done.


Change google file share access to public


Step 8. Before you can use the links, you must replace 'https://drive.google.com/file/d' to 'https://googledrive.com/host' and remove '/edit?usp=sharing' in the link.

For example:

My file link looks like this:

https://drive.google.com/file/d/0B6pDGRGeYi9nampKY0M4dXVOVWc/view?usp=sharing

After replacing 'https://drive.google.com/file/d' to 'https://googledrive.com/host' and removing '/edit?usp=sharing' :

https://googledrive.com/host/0B6pDGRGeYi9nampKY0M4dXVOVWc

Step 9. Now add your link to the following code:

For CSS:

<link rel="stylesheet" type="text/css" href="https://googledrive.com/host/0B6pDGRGeYi9nampKY0M4dXVOVWc" />

Replace https://googledrive.com/host/0B6pDGRGeYi9nampKY0M4dXVOVWc with your CSS file URL.


For JavaScript:

<script src='https://googledrive.com/host/0B6pDGRGeYi9nampKY0M4dXVOVWd' type='text/javascript'/>

Replace https://googledrive.com/host/0B6pDGRGeYi9nampKY0M4dXVOVWd with your JavaScript file URL.

Now you can use these code on your HTML document to add external CSS and JavaScript file.

Step 10. Login to blogger account, then navigate to Template > Edit HTML and place your Code:

For CSS: Place code below <head>.
For JavaScript: Place code above </body>.

Recommended: Use ctrl+f to find above codes.

Read: How to Reduce Blogger Page load time.

That's all!

For any type of issue or suggestion, please comment below. Stay Updated! Browse Howbloggerz :)
Read more ...

Wednesday, 20 April 2016

Removing Hyperlinks From Blogger Post Images

By default Blogger creates a link to the image whenever an image is uploaded to a Blogger post. Sometimes, however, you might want to remove the link to prevent the image from being clickable. A common reason would be to safeguard your image. If you are worried about your image being copied you can prevent it from appearing full size by disabling the link. When you remove the hyperlink off an image from your post, your post image won't be clickable anymore, preventing readers from accessing the larger version of the image.

Removing Hyperlinks From Blogger Post Images
If you are using a custom Blogger template, then you probably have noticed that few of the third-party developed templates does not supports Lightbox functionality, which causes images to be opened in a new tab window whenever they are clicked by the users. Since, Blogger use Picasa web album to host your blog’s images, so whenever user clicks on an image present on your site it ultimately takes them to a different destination, which causes increase in the bounce rate and decrease in the ad sales because your users are not converting they are coming from one end and leaving from the other.

Recently, one of our users asked us that How to Remove Hyperlinks from Post Images in Blogger? The easiest way to remove hyperlinks for post images in blogger is to simply revert to the HTML Tab in the blogger post editor and remove the hyperlink <a href>. However, what if you have to edit large numbers of posts? don't worry, we have prepared set of codes with CSS and JavaScript tweak, not HTML one to automatically remove links. Today in this tutorial, we will show you How to manually or automatically Remove Hyperlinks from single Post image or from Homepage page / Specific post / Specific page / or from all posts in blogger with step by step instructions and images.


Removing Hyperlinks from Posts Images


If you just want to disable the hyperlink from a single image in Blogger try this method. I have found that it removes the link but it will not reinstate it once removed so be sure you want to remove the link before you start otherwise you will need to reinstate the link manually. I suggest you backup before you start.

Removing Hyperlinks Manually / from Single Image

1. By Using Blogger Compose Editor Toolbar ( Easy

Step 1. Login to your blogger account, then navigate to edit post ( From which you want to remove image hyperlink ).

Step 2. Make sure Compose is selected, then select the picture and then click on Link in Toolbar.


Removing image hyperlink using blogger editor


Step 3. Click on Publish / Update.

2. By Using Blogger Post HTML Editor

Step 1. Login to your blogger account, then navigate to edit post ( From which you want to remove image hyperlink ).

Step 2. Make sure HTML is selected, then Find the image hyperlink code.

Note : Their may be more than one Image hyperlink depends upon the number of images in post. Code may vary little because every image have different URL.

Code look like this :

<a href="https://4.bp.blogspot.com/-pqkPpEx7KNY/VxYXv655rRI/AAAAAAAAAmk/HCKXZFHvtCobFrpozByEUuclA7MAjEBYQCKgB/s1600/Vintage-Camera.jpg" imageanchor="1" style="margin-left: 1em; margin-right: 1em;"><img border="0" height="180" src="https://4.bp.blogspot.com/-pqkPpEx7KNY/VxYXv655rRI/AAAAAAAAAmk/HCKXZFHvtCobFrpozByEUuclA7MAjEBYQCKgB/s320/Vintage-Camera.jpg" width="320" /></a>

Step 3. Now remove the hyperlink around the img tag ( Blue color code ).

<a href="https://4.bp.blogspot.com/-pqkPpEx7KNY/VxYXv655rRI/AAAAAAAAAmk/HCKXZFHvtCobFrpozByEUuclA7MAjEBYQCKgB/s1600/Vintage-Camera.jpg" imageanchor="1" style="margin-left: 1em; margin-right: 1em;"><img border="0" height="180" src="https://4.bp.blogspot.com/-pqkPpEx7KNY/VxYXv655rRI/AAAAAAAAAmk/HCKXZFHvtCobFrpozByEUuclA7MAjEBYQCKgB/s320/Vintage-Camera.jpg" width="320" /></a>

Step 4. Click on Publish / Update.


Removing Hyperlinks Automatically From Post Images


Step 1. Login to your blogger account, then navigate to Template > Edit HTML.


edit blogger template

Step 2. Click anywhere inside the code and search for following code ( CTRL+F ) :

</head>


Step 3. Copy and paste the following code just above it to disable Hyperlinks from :

<b:if cond='data:blog.pageType == "item"'>
<script src='http://ajax.googleapis.com/ajax/libs/jquery/2.0.3/jquery.min.js' type='text/javascript'></script>
<script type="text/javascript">
$(document).ready(function() {
$('.post-body a[href]:has(img)').css({"cursor": "default" , "pointer-events": "none" , "-webkit-user-select": "none" , "-khtml-user-select": "none" , "-moz-user-select": "none" , "-o-user-select": "none" , "user-select": "none"})
.click(function() { return false; });
});
</script>
</b:if>
<b:if cond='data:blog.url == data:blog.homepageUrl'>
<script src='http://ajax.googleapis.com/ajax/libs/jquery/2.0.3/jquery.min.js' type='text/javascript'></script>
<script type="text/javascript">
$(document).ready(function() {
$('.post-body a[href]:has(img)').css({"cursor": "default" , "pointer-events": "none" , "-webkit-user-select": "none" , "-khtml-user-select": "none" , "-moz-user-select": "none" , "-o-user-select": "none" , "user-select": "none"})
.click(function() { return false; });
});
</script>
</b:if>
<b:if cond='data:blog.pageType == "static_page"'>
<script src='http://ajax.googleapis.com/ajax/libs/jquery/2.0.3/jquery.min.js' type='text/javascript'></script>
<script type="text/javascript">
$(document).ready(function() {
$('.post-body a[href]:has(img)').css({"cursor": "default" , "pointer-events": "none" , "-webkit-user-select": "none" , "-khtml-user-select": "none" , "-moz-user-select": "none" , "-o-user-select": "none" , "user-select": "none"})
.click(function() { return false; });
});
</script>
</b:if>
<b:if cond='data:blog.url == data:blog.canonicalHomepageUrl + "URL-HERE"'>
<script src='http://ajax.googleapis.com/ajax/libs/jquery/2.0.3/jquery.min.js' type='text/javascript'></script>
<script type="text/javascript">
$(document).ready(function() {
$('.post-body a[href]:has(img)').css({"cursor": "default" , "pointer-events": "none" , "-webkit-user-select": "none" , "-khtml-user-select": "none" , "-moz-user-select": "none" , "-o-user-select": "none" , "user-select": "none"})
.click(function() { return false; });
});
</script>
</b:if>


Step 4. Configuration for Specific post and page only :

Replace URL-HERE with the page / post URL. For example :

If your post URL is : http://www.howbloggerz.blogspot.com/2016/04/removing-hyperlinks-from-blogger-post-images.html
Then add only : 2016/04/removing-hyperlinks-from-blogger-post-images.html

OR

If your page URL is : http://www.howbloggerz.blogspot.com/p/write-for-us.html
Then add only : p/write-for-us.html


Step 5. Click Save Template.

Enjoy!

Now view your blog post images and try a click over it :), as it is impossible to have one global code that works for all templates. If it doesn't work on your template, leave a comment and I'll prepare one that will work for you. Stay Updated, Browse Howbloggerz! :)
Read more ...

Wednesday, 24 February 2016

How To Add Twitter Cards Meta Tags To Blogger

The Twitter cards meta tags were the social media meta tags for Twitter which enable any webpage of your blog to become a rich object in social graph. In short when someone tweet your blog post, the tweeted item looks better on Twitter. It works as Facebook Open Graph works for Facebook posts. For example :

If you posted a link of any of your post on Twitter without setting up Twitter cards tags,
it will look like this :

how to add twitter cards to blogger
twitter tweets without twitter cards blogger


Which is not an impressive piece of content. A social media user cancel this instead of tweeting it, But after adding the Twitter cards meta tags it looks like this :


twitter tweets with twitter cards blogger


This is more likely to get clicked and Tweeted by users, so if you want to add, implement or setup Twitter cards social media meta tags to your blogger just follow the given step by step tutorial with images :


Note : If you have already added Facebook open graph tags in your blogger, then you have to add only basic tags because twitter can fetch data from open graph tags except few.

Steps : How To Add Open Twitter Cards Tags To Blogger


Option 1 : If you have already added Open Graph tags for Facebook.


Step 1. Log in to your Blogger account, then go to Dashboard > Template > Edit HTML.


Edit blogger template


Step 2. Click anywhere inside the Template code, then search for the following code ( CTRL+F ) :


<head>


Step 3. Add this code just below it.


<meta content='summary_large_image' name='twitter:card'/>
<meta content='@your-name' name='twitter:site'/>
<meta content='@your-name' name='twitter:creator'/>


adding twitter cards tags to blogger


Step 4. Configuration of Twitter cards tags :


  • Replace your-name with your name or with your blog title.
  • ( Optional ) Change summary_large_image with the type of twitter card.

Types of Twitter card :


  • summary: Default Card, including a title, description, thumbnail, and Twitter account attribution.
  •  summary_large_image: Similar to a Summary Card, but with a prominently featured image ( Recommended ). For more info click here.


Step 5. Click on Save Template.


Option 2 : If you have not added Open Graph tags for Facebook.


Step 1. Log in to your Blogger account, then go to Dashboard > Template > Edit HTML.


Edit blogger template


Step 2. Click anywhere inside the Template code, then search for the following code ( CTRL+F ) :


<head>


Step 3. Add this code just below it.


<meta content='summary_large_image' name='twitter:card'/>
<meta content='@your-name' name='twitter:site'/>
<b:switch var='data:blog.pageType'>
<b:case value='index'/>
<meta expr:content='data:blog.pageTitle' name='twitter:title'/>
<b:default/>
<meta expr:content='data:blog.pageName' name='twitter:title'/>
</b:switch>
<b:if cond='data:blog.metaDescription != &quot;&quot;'>
<meta expr:content='data:blog.metaDescription' name='twitter:description'/>
</b:if>
<meta content='@your-name' name='twitter:creator'/>
<b:switch var='data:blog.pageType'>
<b:case value='item'/>
<meta expr:content='data:blog.postImageUrl' name='twitter:image'/>
<b:default/>
<meta content='img-url-for-home-page' name='twitter:image'/>
</b:switch>


adding twitter cards meta tags to blogger


Step 4. Configuration of Twitter cards tags :


  • Replace your-name with your name or with your blog title.
  • ( Optional ) Change summary_large_image with the type of twitter card.
  • Replace img-url-for-home-page with url of the image you want to show for homepage.

Types of Twitter card :


  • summary: Default Card, including a title, description, thumbnail, and Twitter account attribution.
  •  summary_large_image: Similar to a Summary Card, but with a prominently featured image ( Recommended ). For more info click here.


Step 6. Click Save template.


Enjoy !


Now you will see optimized Title, description, image etc on your Twitter tweet linked with your blogger. If you have any issue use Twitter card Validator . Still not resolved comment below. Stay Updated, Browse Howbloggerz ! :)
Read more ...

Tuesday, 23 February 2016

Add Open Graph Tags To Blogger (with Images)

Updated on: March 12, 2017

The Open Graph meta tags were the social media meta tags for Facebook. These tags help you to make your blog post a rich object in the social media world. In short, when someone shares your blog post, the shared item looks better on Facebook. It works as Twitter card for twitter works.

If you share your post on Facebook without setting up open graph tags, it will look like this:

Facebook Open graph tags for blogger
Facebook post without open graph blogger

Which is not an impressive piece of content. Most probably a social media user will ignore this, instead of sharing or clicking it, But if you add the Facebook open graph meta tags, your posts will looks like this:

Facebook post with open graph tags blogger

This is more likely to get clicked and shared by users, so if you want to setup Facebook's open graph social media meta tags protocol to your blogger just follow the given step by step instructions with images.

Those users who get a wrong image (or a wrench img) on sharing the post on Facebook should also follow the given steps.

How To Implement Open Graph Meta Tags in Blogger

Step 1. Log in to your Blogger account, then goto Themes > Edit HTML.

Edit Blogger Theme

Step 2. Click anywhere inside the code, and then search for the following code (Use CTRL+F):

<html

Step 3. Add below code at the end of searched code before close tag '>'.

xmlns:og='http://ogp.me/ns#'
Add open graph in blogger

Step 4. Again search for the following code:

<b:include data='blog' name='all-head-content'/>

Step 5. Add this code just below it:

<meta content='article' property='og:type'/>
<b:if cond='data:blog.url == data:blog.homepageUrl'>
<meta content='[homepage Image URL]' property='og:image'/>
<meta content='[homepage Image Width]' property='og:image:width' />
<meta content='[homepage Image Height]' property='og:image:height' />
</b:if>
<meta expr:content='data:blog.title' property='og:site_name'/>
<meta content='[Facebook profile Id]' property='fb:admins'/>
<b:if cond='data:blog.pageType == "item"'>
<meta content='https://www.facebook.com/username' property='article:author'/>
</b:if>
<meta content='en_US' property='og:locale'/>

Note: Open graph Tags for post "URL", "image", "description" and "title" are already there by default, so no need to add them again.

Step 5. Configuration:

Note: Recommended Image dimensions for better output in Facebook post: 1200 x 630px

  • Replace [homepage Image URL] with the URL of the image for homepage.
  • Replace [homepage Image Width] with the Width of the homepage Image.
  • Replace [homepage Image Height] with the Height of the homepage Image.
    For Height and Width, Use only numeric value like '1200' or '630')
  • Note: This image will be shown when you will share your main blog address or homepage on Facebook.

    Read: How to Upload and Get Image URL

  • Replace [Facebook profile Id] with your Facebook profile id. To get your profile id Click here.
  • Replace username with your Facebook username.
  • To find your username visit your Facebook profile, Then check your address bar.
    It’ll look like https://www.facebbok.com/username

    If you have not set the username yet it may look like:
    https://www.facebook.com/profile.php?id=some-random-number
    You can replace the above URL with this or you can create your username by visiting your Facebook's settings.

  • (Optional) Here en_US is the language_TERRITORY that is US-English if your blog is in different language replace it. For language code details click here .

Step 6. Click Save theme.

That's it !

Now, your shared post on Facebook will become a rich object with beautiful appearance. You can also setup Twitter card in the same way. If you have any issue use Facebook open graph, Use this Facebook Debugging tool or comment below. Stay Updated, Browse Howbloggerz! :)

Read more ...