Showing posts with label How To. Show all posts

Tuesday, 7 March 2017

How to Generate HTML Sitemap Page on Blogger

Updated on: March 08, 2017
Before going forward to add Sitemap page it is very important to understand the difference between HTML sitemap and XML sitemap.

What is XML Sitemap?

Actually, the Search engine uses their respective web crawlers (bots) to discover pages from links within the site and from other sites. XML Sitemap is a .xml file attached to your website which supplies this data to crawlers. Sitemap file consists of all posts URL with additional information regarding each URL. The Search engine uses this data to index your posts in the best possible way. Use of XML Sitemap file guarantees that your web pages will get indexed in search engines.

How to Generate HTML Sitemap Page on Blogger
How to add and submit an XML sitemap to google and other search engines

What is HTML Sitemap?

HTML sitemap is a regular HTML page which can be read by search engine bots as well as by visitors. Web crawler treats it like a regular HTML page (with many links). The main purpose of the using HTML based sitemap is to represent all your posts in an organized manner so that your users can navigate all of your posts through a single page.
Features
- Post list will update automatically with the addition of new posts.
- Automatic addition of Suffix 'new' to newly added posts.
- Sorted alphabetically (ascending)

How to add sitemap page in blogger

Note: This is Label Based Sitemap Page and you can only apply label based themes on it.
Step 1. Login to your Blogger account, then go to Pages > New page.
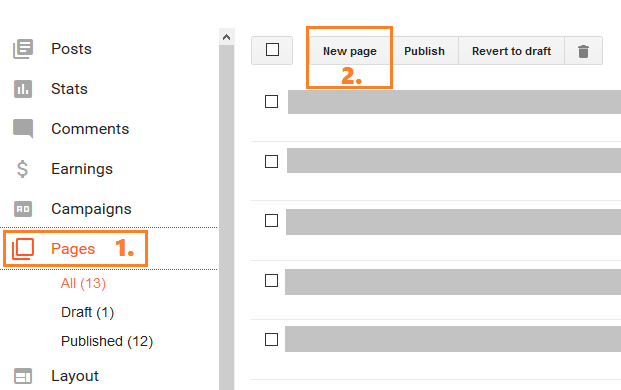
Create HTML based Sitemap Page on Blogger
Step 2. Enter "Site Map" in Page title field.
Step 3. Switch to HTML mode.
How to add sitemap in blogger
Step 4. Enter following inside blank field.
Note: Clear any default code inside HTML field before pasting provided code.
Read: How to Automatically Remove Default Code from Blogger's Writing Panel

<script type='text/javascript'>

var postTitle = new Array();
var postUrl = new Array();
var postPublished = new Array();
var postDate = new Array();
var postLabels = new Array();
var postRecent = new Array();
var sortBy = "titleasc";
var numberfeed = 0;

function bloggersitemap(a) {
    function b() {
        if ("entry" in a.feed) {
            var d = a.feed.entry.length;
            numberfeed = d;
            ii = 0;
            for (var h = 0; h < d; h++) {
                var n = a.feed.entry[h];
                var e = n.title.$t;
                var m = n.published.$t.substring(0, 10);
                var j;
                for (var g = 0; g < n.link.length; g++) {
                    if (n.link[g].rel == "alternate") {
                        j = n.link[g].href;
                        break
                    }
                }
                var o = "";
                for (var g = 0; g < n.link.length; g++) {
                    if (n.link[g].rel == "enclosure") {
                        o = n.link[g].href;
                        break
                    }
                }
                var c = "";
                if ("category" in n) {
                    for (var g = 0; g < n.category.length; g++) {
                        c = n.category[g].term;
                        var f = c.lastIndexOf(";");
                        if (f != -1) {
                            c = c.substring(0, f)
                        }
                        postLabels[ii] = c;
                        postTitle[ii] = e;
                        postDate[ii] = m;
                        postUrl[ii] = j;
                        postPublished[ii] = o;
                        if (h < 10) {
                            postRecent[ii] = true
                        } else {
                            postRecent[ii] = false
                        }
                        ii = ii + 1
                    }
                }
            }
        }
    }
    b();
    sortBy = "titledesc";
    sortPosts(sortBy);
    sortlabel();
    displayToc();
}

function sortPosts(d) {
    function c(e, g) {
        var f = postTitle[e];
        postTitle[e] = postTitle[g];
        postTitle[g] = f;
        var f = postDate[e];
        postDate[e] = postDate[g];
        postDate[g] = f;
        var f = postUrl[e];
        postUrl[e] = postUrl[g];
        postUrl[g] = f;
        var f = postLabels[e];
        postLabels[e] = postLabels[g];
        postLabels[g] = f;
        var f = postPublished[e];
        postPublished[e] = postPublished[g];
        postPublished[g] = f;
        var f = postRecent[e];
        postRecent[e] = postRecent[g];
        postRecent[g] = f
    }
    for (var b = 0; b < postTitle.length - 1; b++) {
        for (var a = b + 1; a < postTitle.length; a++) {
            if (d == "titleasc") {
                if (postTitle[b] > postTitle[a]) {
                    c(b, a)
                }
            }
            if (d == "titledesc") {
                if (postTitle[b] < postTitle[a]) {
                    c(b, a)
                }
            }
            if (d == "dateoldest") {
                if (postDate[b] > postDate[a]) {
                    c(b, a)
                }
            }
            if (d == "datenewest") {
                if (postDate[b] < postDate[a]) {
                    c(b, a)
                }
            }
            if (d == "orderlabel") {
                if (postLabels[b] > postLabels[a]) {
                    c(b, a)
                }
            }
        }
    }
}

function sortlabel() {
    sortBy = "orderlabel";
    sortPosts(sortBy);
    var a = 0;
    var b = 0;
    while (b < postTitle.length) {
        temp1 = postLabels[b];
        firsti = a;
        do {
            a = a + 1
        } while (postLabels[a] == temp1);
        b = a;
        sortPosts2(firsti, a);
        if (b > postTitle.length) {
            break
        }
    }
}

function sortPosts2(d, c) {
    function e(f, h) {
        var g = postTitle[f];
        postTitle[f] = postTitle[h];
        postTitle[h] = g;
        var g = postDate[f];
        postDate[f] = postDate[h];
        postDate[h] = g;
        var g = postUrl[f];
        postUrl[f] = postUrl[h];
        postUrl[h] = g;
        var g = postLabels[f];
        postLabels[f] = postLabels[h];
        postLabels[h] = g;
        var g = postPublished[f];
        postPublished[f] = postPublished[h];
        postPublished[h] = g;
        var g = postRecent[f];
        postRecent[f] = postRecent[h];
        postRecent[h] = g
    }
    for (var b = d; b < c - 1; b++) {
        for (var a = b + 1; a < c; a++) {
            if (postTitle[b] > postTitle[a]) {
                e(b, a)
            }
        }
    }
}


function displayToc() {
    var a = 0;
    var b = 0;
    while (b < postTitle.length) {
        temp1 = postLabels[b];
        document.write("");
        document.write('<div class="post-archive"><h4>' + temp1 + '</h4><div class="ct-columns">');
        firsti = a;
        do {
            document.write("<p>");
            document.write('<a " href="' + postUrl[a] + '">' + postTitle[a] + "");
            if (postRecent[a] == true) {
                document.write(' - <strong><span>New!</span></strong>')
            }
            document.write("</a></p>");
            a = a + 1
        } while (postLabels[a] == temp1);
        b = a;
        document.write("</div></div>");
        sortPosts2(firsti, a);
        if (b > postTitle.length) {
            break
        }
    }
}

</script>

<script src="http://yourblog.blogspot.com/feeds/posts/default?max-results=9999&amp;alt=json-in-script&amp;callback=bloggersitemap"></script>
Note: Dismiss any type of HTTPS errors.
Step 5. Configuration
- Replace yourblog.blogspot.com with your blog URL.

Step 6. Under Page settings > inside Search Description field add page description.
Step 7. Click on Options > under Reader comments > select Don't allow > Done.
Automatically updating tabular list of posts for blogspot
Step 8. Click Publish.
Note: This tutorial is only about to add Simple HTML Sitemap. You can apply different colorful themes on this sitemap.
Read: Themes of HTML Sitemap Page - Label based (SEQL)

Happy Blogging!
You have successfully added an HTML based sitemap page on your blog. Place your Site Map page link, wherever you would like to show your Site Map page. You can also apply different themes on this sitemap provided by Howbloggerz. For any issues related to above Tutorial Please Comment Below. Stay Updated, Browse Howbloggerz! :)


Read more ...

Thursday, 15 December 2016

How to Submit Blogger Sitemap to Search Console

Updated on: December 15, 2016
It was already discussed How to create account for your blog in Google Search Console. After creating your Google Search Console account you need to add your blog sitemap in it so that all of your blog posts can be indexed by google in search results for relevant queries. Moreover you can manage which post to show and which not in the results and more.


Submit blogspot sitemap to google webmaster tools

What is Sitemap?


According to Wikipedia The Sitemaps protocol allows a webmaster to inform search engines about URLs on a website that are available for crawling. A Sitemap is an XML file that lists the URLs for a site. It allows webmasters to include additional information about each URL: when it was last updated, how often it changes, and how important it is in relation to other URLs in the site. This allows search engines to crawl the site more intelligently. Sitemaps are a URL inclusion protocol and complement robots.txt, a URL exclusion protocol.

How to add your blogger sitemap in search console

Many other tutorial website may suggest you to add sitemap using RSS URL which is messy, complex and of large size because before few years back blogger blogs doesn't have their sitemap xml file that's why many users use RSS/ATOM to serve as sitemap but recently blogger started providing sitemap xml file which is attached to each blogger blog. Moreover official blogger sitemap file is small in size, easy to understand and updated instantly with addition of new posts.
Step 1. Open your Search console account.
Step 2. Navigate to Crawl > Sitemaps > ADD/TEST SITEMAP.
Adding blogger sitemap to Google Search Console
Step 3. Add sitemap.xml and click submit.
How to submit your blog xml sitemap file
UP!
Suggestion: In similar way you can submit your blog sitemap to Bing webmasters and others
Your blog posts will start getting indexed in google results soon. For any issues related to above Tutorial Please Comment Below. Stay Updated, Browse Howbloggerz ! :)
Read more ...

How to Add Your Blog in Google Search Console

Updated on: December 15, 2016
Google Search Console (earlier known as Google Webmaster tools) is a collection of online professional web tools provided by google for free. GSC help you to manage your website for google search results. GSC include features like Search appearance, Search traffic analytic, error checking, website improvement suggestions and so more.

How to Attach Your Blog in Google Search Console
Step 1. Go-to https://www.google.com/webmasters/tools and then login with your google account.
Step 2. Enter your blog address in the given area.
  • For Custom domain users: http://www.example.com you can also use https instead of http if you have purchased SSL from your domain registrar.
  • For Normal blogger users: http://www.example.blogspot.com you can also use https instead of http because blogger provide SSL for its sub-domains free of cost.
Submit your Blog on Google Search Console
Note: If your are using https make sure https redirect is 'on' in Settings > Basic > HTTPS
Step 3. If you have used same google account to login in search console that was linked with blogger account then your blog will automatically get verified.
Add Your blogspot on webmaster tools
Step 4. Click on "Not now".
Note: If you didn't get verified as an owner of website then you can use alternative given methods.
Read: How to Add Sitemap in Google Search Console using Official sitemap URL.
Awesome!
Now you have successfully created your Search console account and have attached your blog with it. For any issues related to above Tutorial Please Comment Below. Stay Updated, Browse Howbloggerz ! :)
Read more ...

Thursday, 21 July 2016

Remove dir="ltr" trbidi="on" from Blogger Posts

Updated on: July 21, 2016
Remove dir=
How to remove default code dir ltr trbidi on from blogger
All of you create posts in blogger, but have you ever notice that whenever you create a new post blogger by default add code <div dir="ltr" style="text-align: left;" trbidi="on"> at the top/starting of your blog post (in post HTML). Now the questions are, Why blogger automatically adds that piece of code in your posts? What is the use of that code? Can we remove that code? What happen if we remove that code?

Actually the "ltr" and "trbidi" settings are used by blogger to support both "ltr" and "rtl" justified languages. This piece of code helps your readers to read translated Arabic, Syriac and Mandaean (or rtl) languages properly on your blog. This code is not necessary and you can remove this code from your post.
PROS :-
  • Make your post code clean and tidy.
  • Remove override CSS code style="text-align: left;".
  • Your readers can still translate your page by using tools like Google translator.
  • You can reverse the setting at any time (default setting).
CONS :-
  • Your blog can no more support translated "rtl" languages.
In 2015 blogger have officially provided the option to remove <div dir="ltr" style="text-align: left;" trbidi="on"> from posts with blogger setting. Yes! now it is so easy to remove the above code with only 3 easy simple steps.

How to Remove the code dir="ltr" trbidi="on" from all posts

Step 1. Login to your blogger account, then navigate to Settings > Language and formatting.
Step 2. In the section "Enable transliteration" select disabled.
How to disable ltr and trbidi setting in blogger
Step 3. Click Save settings.
Note: The code will no longer exist whenever you create new post but you have to manually edit the post HTML to remove code from already published posts.
That's all!
Refresh your blog posts list and create a new post. Switch to HTML, and you will find no such code in your blog. Don't thank me, thank blogger for giving us control. For any issues related to above Tutorial Please Comment Below. Stay Updated, Browse Howbloggerz! :)
Read more ...

Tuesday, 19 July 2016

Search Results "Sort By Date" Order in Blogspot

Updated on: July 20, 2016
How to set Sort by date as default sorting order in blogger
How to set default order for search result

We have already discussed that Search is the necessary part of the blog/blogspot and whenever your users make search over it the resultant page shows results sorted by relevance for the give query for example:

Showing posts sorted by relevance for query sample. Sort by date Show all posts

Many of you want to change the order and would like to set "Sort By Date" as the default sorting order not "Sort by Relevance" so that your viewers can see your latest posts first without clicking on link each time to change the order. This method works only with 3rd party search boxes. Follow the given steps carefully.

How To Set "Sort By Date" As Default Sorting Order

Step 1. Login to your Blogger account, then navigate to your 3rd party Search Box code.

For example:

<form action="/search" method="get">
<input type="text" name="q" placeholder="Type Here..."/>
<input type="hidden" name="max-results" value="8"/>
<input type="submit" value="Search" />
</form>

Note: The above code may vary.

Step 2. Find the code </form> and paste the following code just above it.

<input name="by-date" type="hidden" value="true"/>

For Example:

<form action="/search" method="get">
<input type="text" name="q" placeholder="Type Here..."/>
<input type="hidden" name="max-results" value="8"/>
<input type="submit" value="Search" />
<input name="by-date" type="hidden" value="true"/>
</form>

Step 3. Save your code.

Read: How to Change Status message on search result page

Enjoy!

Jump into your blog and make a search. Wait! What? your search result is sorted by date not by relevance. Remember code may vary according to your search box, if the above tutorial doesn't work for you don't worry - comment below. Stay Updated, Browse Howbloggerz ! :)

Read more ...

Saturday, 16 July 2016

How to Increase Video Size in Blogger Posts

Updated on: July 16, 2016
How to increase video size in blogger posts
Steps to change youtube video size for blogger posts

Embedding a YouTube video in your blog post is the best practice to make your post content rich and visually effective. Moreover adding videos in your post helps you to decrease the bounce rate and increases your revenue.

We can easily add videos on our posts by using blogger post editing tool bar but by default blogger post's video size is small and doesn't fill the whole post width, that small size can affect your video impact on readers. So, to increase the size of your blogger video (By maintaining its ratio) so that viewers can see clearly just follow the give tutorial with images.

Post video before and after

Steps: How To Change YouTube Video Size

Step 1. Login to your blogger account > Dashboard > Template > Edit HTML

Edit HTML Template

Step 2. Click anywhere inside the code and find the following code (use Ctrl + F):

</head>

Step 3. Just above it place the following code:

<script src='//ajax.googleapis.com/ajax/libs/jquery/2.0.3/jquery.min.js' type='text/javascript'></script>
<script>
$('.YOUTUBE-iframe-video').ready(function(){
$('.YOUTUBE-iframe-video').parent().css({
    'position': 'relative',
    'padding-bottom': '56.25%',
    'height': '0',
    'clear': 'both',
    'text-align': 'center',
    'margin': '20px 0'
});

$('.YOUTUBE-iframe-video').css({
    'position': 'absolute',
    'top': '0',
    'left': '0',
    'width': '100%',
    'height': '100%',
});
});
</script>

Step 4. Click Save template.

Done !

All of your embedded YouTube videos will be of full size and responsive with your post width. If you have and issue related to above tutorial comment below. Stay Updated, Browse Howbloggerz ! :)

Read more ...

Monday, 13 June 2016

How To Convert Inline CSS or JavaScript To External File

CSS stands for Cascading Style Sheets. CSS describes how HTML elements are to be displayed on screen, paper, or in other media. CSS saves a lot of work. It can control the layout of multiple web pages all at once. JavaScript is an object-oriented computer programming language commonly used to create interactive effects within web browsers.

How To Convert Inline CSS or JavaScript To External File
What is inline CSS and JavaScript? All the CSS and JavaScript that are embedded in HTML document are know as inline CSS or JavaScript.

What is External CSS and JavaScript? All the CSS and JavaScript that are hosted externally as External file are known as External CSS or JavaScript.

Benefits of External CSS and JavaScript.

- Optimize Page load time.
- Makes HTML document lighter.
- Increases browser caching.
- Makes your document clean and tidy.
- Easy to manage.

How to Host Blogger CSS and JavaScript on google drive

There are so many file hosting services, but google drive is free and easy to manage. You can also use google drive for windows to quickly manage your files.

Step 1. Open Notepad > Paste your code (for CSS remove <style> and </style>, for JavaScript remove <script> and </script>.

Step 2. In the Notepad menu, select 'File' > 'Save as' and type the file name with extension .css for CSS and .js for JavaScript.


Preparing CSS and Javascript file to host online

Step 3. In the same window, choose "All files" in the "Save as type" option and set the Character Encoding to UTF-8.

Step 4. Open Google drive and login with your Gmail account. After you logged in, click on the 'NEW' button and add a new separate folder to upload your JavaScript and CSS files.


How to add folder in Google drive


Step 5. Open the newly created folder, and click on the NEW > File Upload. then choose the files that you need to upload.


How to upload file in google drive


Step 6. After the files have been successfully uploaded, right click on the file names and select 'Share'. Again in the pop-up select advance.


How to share file on google drive


 Step 7. Change file access from 'private' to 'Anyone'. Then copy your file link and click done.

Change google file share access to public


Step 8. Before you can use the links, you must replace 'https://drive.google.com/file/d' to 'https://googledrive.com/host' and remove '/edit?usp=sharing' in the link.

For example:

My file link looks like this:

https://drive.google.com/file/d/0B6pDGRGeYi9nampKY0M4dXVOVWc/view?usp=sharing

After replacing 'https://drive.google.com/file/d' to 'https://googledrive.com/host' and removing '/edit?usp=sharing' :

https://googledrive.com/host/0B6pDGRGeYi9nampKY0M4dXVOVWc

Step 9. Now add your link to the following code:

For CSS:

<link rel="stylesheet" type="text/css" href="https://googledrive.com/host/0B6pDGRGeYi9nampKY0M4dXVOVWc" />

Replace https://googledrive.com/host/0B6pDGRGeYi9nampKY0M4dXVOVWc with your CSS file URL.


For JavaScript:

<script src='https://googledrive.com/host/0B6pDGRGeYi9nampKY0M4dXVOVWd' type='text/javascript'/>

Replace https://googledrive.com/host/0B6pDGRGeYi9nampKY0M4dXVOVWd with your JavaScript file URL.

Now you can use these code on your HTML document to add external CSS and JavaScript file.

Step 10. Login to blogger account, then navigate to Template > Edit HTML and place your Code:

For CSS: Place code below <head>.
For JavaScript: Place code above </body>.

Recommended: Use ctrl+f to find above codes.

Read: How to Reduce Blogger Page load time.

That's all!

For any type of issue or suggestion, please comment below. Stay Updated! Browse Howbloggerz :)
Read more ...

Wednesday, 25 May 2016

5 Steps to Add Signature to Blogger Posts (with Demo)

Do you want to add a signature text or image to your Blogger posts? Post signature is usually a text or an image at the end of each post, adding custom signature to your blogger posts not only give it certain flair but also gives a visible stamp of your authority over your blog content. You can manually insert signature to new blog posts but what about old post, its not easy to add signature manually in already published posts specially if they are in hundreds.

Don't worry your are howbloggerz user, nothing is impossible here. I have created a set of CSS and HTML code to automatically add signature in old and upcoming new posts. The best part about this method is that you can edit your signature at any time and the changes will reflect on every post.
How to add signature to blogger posts

There are two types of signature you can add either text or image and both have different way of installing therefore i have added instruction for both types with images and created a demo to make you have a look.


Added signature to blogger posts


How to Add Signature to Blogger Posts


Step 1. Login to your blogger account > Dashboard > Template > Edit HTML


how to edit blog template for adding signature in posts


Step 2. Click anywhere inside the code and find the following code ( use Ctrl + F ) :

<div class='post-footer'>

Note : There are two occurrence of the above code. 1st occurrence for mobile view and second for desktop.


Step 3. Just above <div class='post-footer'> Place the following code:


     <style type="text/css">
.hbz-signature {
     font-size: 22px;
     font-family: Papyrus,fantasy;
     text-shadow: 5px 2px 2px #dddddd;
     margin-top : 30px;
     text-color: #222222;
}

.hbz-signature span {
     font-size: 14px;
     vertical-align: top;
}
    </style>
    <div class="hbz-signature"><span>By</span> You Name</div>
    <style type="text/css">
.hbz-signature {
     margin-top: 30px;
}

.hbz-signature img {
     background: transparent none repeat scroll 0% 0%;
     border: medium none;
     box-shadow: none;
}
    </style>
    <div class="hbz-signature"><img src="Your Signature Image URL"  alt="Your Image Name"/></div>


 Step 4. Configuration of Code:


For Text Signature:

  • Adjust the value 22 to change font size of text.
  • Replace the value Papyrus,fantasy to change the font family of the text (List of Font Family).
  • Replace the value #dddddd to change text shadow color (Color Codes).
  • Replace the value #222222 to change text color.
  • Replace You Name with your name or with any other text.

For Image Signature:

Note: To create your Signature image you can use photo editing software on your mobile or machine, or the online Pixlr editor.

If you don't know much about editing, you can use tool Mylivesignatue (Recommended).

  • Replace Your Signature Image URL with the URL of the image.
  • Replace Your Image Name with name of the image.
Read : How to Get the URL of an Image

    Step 4. Click Save template.


    That's all!


    Now go through your blog and see you signature text or image on each blogger post. Coding usually depends on the template you are using, therefore if you have and issue related to above tutorial comment below. Stay Updated, Browse Howbloggerz ! :)
    Read more ...

    Thursday, 19 May 2016

    How to Change Blogger Email address (with Images)

    Blogger does not provide option to change primary email id and so many blogger user asking "how to change my blogger email address" with different reasons, chosen a wrong blogger email address at the time of creating a blogspot blog is one of the top reason but if you are also looking to change your blogspot login email address with any reason then you are at right place.
    how to change blogger email address with images

    Now days their are too many different ways to change blogger account email id but don't worry i have come with easy one, i have created an article on the best and easiest way to change your email address on blogger including step by step instructions (with images):

    Changing Blogger Login Email Address


    Step 1. Login to your blogger account for which you want to change your login email id.

    Step 2. Now navigate to Blogger Dashboard > Settings > Basics > Permissions section.

    Step 3. Click + Add authors and send an author invitation to your new email id.

    adding author to blogger to change email id


    Step 4. Go and Accept the author invitation in your new email address and again login to blogger with old email id.

    Step 5. Again navigate to Permissions section. You will see another author in Permissions section. Change the role of new email id from Author to Admin.

    changing page role to change blogger email


    Step 6. Now login to blogger with your new email address. You will see your blog in dashboard.

    Step 7. Go to Settings > Basic > Permission section and remove your old email address from the Blog Authors.

    removing old blogger email address

    That's it!


    You have successfully changed your blogspot email address with new email id. For any issues related to above tutorial comment below. Stay Updated, Browse Howbloggerz ! :)
    Read more ...

    Tuesday, 17 May 2016

    How to Customize Blogger's Official Lightbox

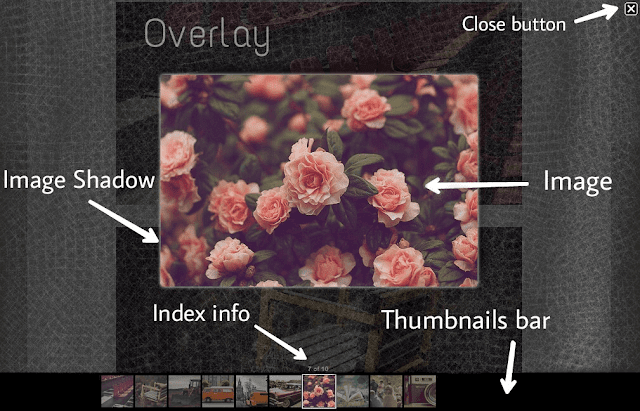
    Blogger by default added the Lightbox feature to add more interactivity to images we normally upload in our post, with their lightbox its much more easier to view images by using the arrow keys and even the background is darker for getting more focus on the images instead of text added in that post. But till now we do not have any option to customize the overall looks of lightbox by changing its background color, changing the bar color containing all the images small thumbnails and much more.

    How to Customize Blogger's Official Lightbox
    For those of you who have chosen to use the Blogger's Lightbox View instead of custom jquery lightbox for displaying pictures when clicking on them now have the option to change its style in a whole different way by just using few line's of CSS code. You will be able to change the black color of the screen, the border or shadow of the images and the color of the thumbnails background. It means we can customize the Blogger Lightbox entirely on our taste. After adding our CSS code, the entire look of the lightbox window will be changed - the background color, the bar showing the thumbnails, the border of images, the text within it, transparency and the close button. Now just follow the given step by step tutorial with images and demo :


    adding css to custommize blogger official lightbox


    How to Customize Blogger's Official Lightbox


    Step 1. Login to your blogger account > Dashboard > Template > Edit HTML


    how to edit blog template


    Step 2. Click anywhere inside the code and find the following code ( use Ctrl + F ) :

     ]]></b:skin>

    Step 3. Just above ]]></b:skin> add following CSS :


        /* Background or Overlay*/

        .CSS_LIGHTBOX_BG_MASK {
        background-color: #000000 !important;
        background-image: url(background-image-url) !important;
        opacity: 0.8 !important;
        filter: alpha(opacity=90) !important;
        }


        /* Images Border and Shadow */

        .CSS_LIGHTBOX_SCALED_IMAGE_IMG {
        outline: 0px solid #fff !important;
        -webkit-border-radius: 5px;
        -moz-border-radius: 5px;
        border-radius: 5px;
        -webkit-box-shadow: 0px 0px 5px #ffffff;
        -moz-box-shadow: 0px 0px 5px #ffffff;
        box-shadow: 0px 0px 5px #ffffff;
        }


        /* Close Button */

        .CSS_LIGHTBOX_BTN_CLOSE {
        background-image: url(button-image-url) !important;
        }


        /* Thumbnails Bar */

        .CSS_LIGHTBOX_FILMSTRIP {
        background-color: #000000 !important;
        }


        /* Index Info (number of images) */

        .CSS_LIGHTBOX_INDEX_INFO {
        color: #898989 !important;
        }

    Step 4. Configuration of CSS:

    - Replace background-image-url with the URL of the image for background.
    - Replace button-image-url  with the URL of the image for close button.
      For example : background-image: url(https://www.image.com/image.jpg) !important;

      Related post: How to get image URL

      Note : If you want use default value for close button then remove the CSS :

                     /* Close Button */

                     .CSS_LIGHTBOX_BTN_CLOSE {
                     background-image: url(button-image-url) !important;
                      }


    - Adjust the value 0.8 ( from 0 to 1 ) to change the transparency (Opacity) of background.

    - Replace the value #xxxxxx to change the color of particular element in particular section (Color Codes).
    • For example : Say if you want to change the background color of  Thumbnails bar to #ffffff, then change the value #000000 to #ffffff under  /* Thumbnails Bar */ inside background-color :

           /* Thumbnails Bar */

          .CSS_LIGHTBOX_FILMSTRIP {
          background-color: #ffffff !important;
          }

    • Or Say if you want change the Text color of Index Info then change the value #898989 with any other say #dddddd under /* Index Info (number of images) */ inside color :

          /* Index Info (number of images) */

          .CSS_LIGHTBOX_INDEX_INFO {
          color: #dddddd !important;
          }

    - Adjust the value 5  to change the radius of image (all 3 values should be same).

    Note: Make sure your blogger lightbox is enabled - Settings > Posts, comments and sharing > Showcase images with Lightbox


    Step 5. Click Save template.

    Great !

    Refresh your blog and click on any image to see your own customized blogger lightbox. For any issues related to above tutorial comment below. Stay Updated, Browse Howbloggerz ! :)
    Read more ...

    Tuesday, 10 May 2016

    How To Add jQuery Drop Down Menu To Blogger

    Drop down Navigation menu is an essential part of any blog or website. Maintaining a clean, easy to use navigation menu is a huge part of creating an effective design. Too many links can confuse a reader, while too few can leave them wondering what they’re missing. A drop down menu is a great way to hide extra links while still making them available to curious readers. Drop down menus can help organize and categorize content links. If your blog contains a large amount of information and you’re interested in categorizing your links a little better, a drop down menu might be the ticket! It helps visitors to easily get the required content from the whole blog.

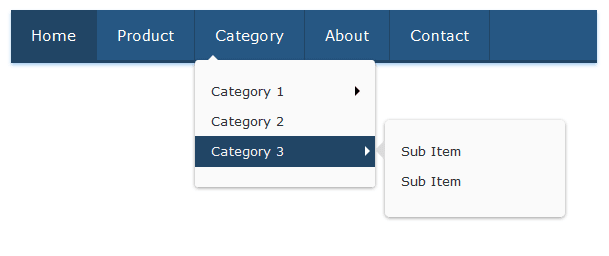
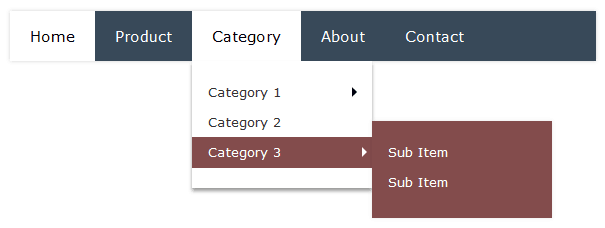
    Stylish jQuery menu for blogger with highlighter

    Since Blogger doesn’t offer the option to automatically add a drop down menu as WordPress does, we have to make our own. This requires a little bit of CSS and HTML knowledge, but I will walk you through it so it doesn’t seem so confusing. The menu I’ve put together is built entirely with CSS3, HTML, jQuery and JavaScript. You can view a demo of it here. While WordPress makes it easy to add a drop down menu (sub items), it’s a little more complicated on Blogger. We’ll basically be creating a list within a list, and all that’s needed is some extra code and styling! To get started, you’ll need to follow the below tutorial with images:

    Adding The jQuery 2-Sub Drop Down Menu


    Step 1. Login to your blogger account > Dashboard > Template > Edit HTML


    how to edit blog template


    Step 2. Click anywhere inside the code and find the following code ( use Ctrl + F ) :

    </header>

    Step 3. Just below </header> add the following HTML code :

     <div id="navmenu">
        <ul>
            <li><a class="highlight" href="#">Home</a></li>
            <li><a href="#">Product</a>
                  <ul>

                  <li><a href="#">Product 1</a>
                        <ul>
                          <li><a href="#">Sub Item</a></li>
                          <li><a href="#">Sub Item</a></li>
                        </ul>
                  </li>

                  <li><a href="#">Product 2</a>
                        <ul>
                          <li><a href="#">Sub Item</a></li>
                          <li><a href="#">Sub Item</a></li>
                        </ul>
                  </li>

                  </ul>
            </li>
            <li><a href="#">Category</a>
                  <ul>

                  <li><a href="#">Category 1</a>
                        <ul>
                          <li><a href="#">Sub Item</a></li>
                          <li><a href="#">Sub Item</a></li>
                        </ul>
                  </li>
                  <li><a href="#">Category 2</a></li>
                  <li><a href="#">Category 3</a>
                        <ul>
                          <li><a href="#">Sub Item</a></li>
                          <li><a href="#">Sub Item</a></li>
                        </ul>
                  </li>

                  </ul>
            </li>
            <li><a href="#">About</a></li>
            <li><a href="#">Contact</a></li>
        </ul>
    </div>

    Step 4. Configuration of HTML code :


    1. Replace # with the URL of the link.


    Say if your post URL is  http://howbloggerz.blogspot.com/2016/05/how-to-add-drop-down-menu-to-blogger.html
    or if your page URL is  http://howbloggerz.blogspot.com/p/page.html

    To make sure that current page link highlighter works properly with country redirect.

    Add only : /2016/05/how-to-add-drop-down-menu-to-blogger.html
    or /p/page.html


    Example :

    <a href="/2016/05/how-to-add-drop-down-menu-to-blogger.html">Title</a>

    Note: Use full URL for home page link ( do not use above format ).


    2. Replace the text inside the code with title of that specific URL.


    <a href="#">Title</a>

    3. How to add more categories :


    To add another category say "Group" before "About", place the following code just above it :

    <li><a href="#">Group</a></li>

    Example :

    <div id="navmenu">
        <ul>
            <li><a class="highlight" href="#">Home</a></li>
            <li><a href="#">Product</a>
                  <ul>

                  <li><a href="#">Product 1</a>
                        <ul>
                          <li><a href="#">Sub Item</a></li>
                          <li><a href="#">Sub Item</a></li>
                        </ul>
                  </li>

                  <li><a href="#">Product 2</a>
                        <ul>
                          <li><a href="#">Sub Item</a></li>
                          <li><a href="#">Sub Item</a></li>
                        </ul>
                  </li>

                  </ul>
            </li>
            <li><a href="#">Category</a>
                  <ul>

                  <li><a href="#">Category 1</a>
                        <ul>
                          <li><a href="#">Sub Item</a></li>
                          <li><a href="#">Sub Item</a></li>
                        </ul>
                  </li>
                  <li><a href="#">Category 2</a></li>
                  <li><a href="#">Category 3</a>
                        <ul>
                          <li><a href="#">Sub Item</a></li>
                          <li><a href="#">Sub Item</a></li>
                        </ul>
                  </li>

                  </ul>
            </li>
            <li><a href="#">Group</a></li>
            <li><a href="#">About</a></li>
            <li><a href="#">Contact</a></li>
        </ul>
    </div>


    4. How to add Sub-category :


    Say if you want to add sub-category to category "Group" then place the following code just above the closing tag </li> of "Group" :

    <ul>
    <li><a href="#">Sub Group</a></li>
    </ul>

    Example :

    <li><a href="#">Group</a>
          <ul>
          <li><a href="#">Sub Group</a></li>
          </ul>
    </li>

    To add another sub category in "Group" add following code just above closing tag </ul> of  "Group" :

    <li><a href="#">Sub Group</a></li>

    Example :

    <li><a href="#">Group</a>
          <ul>
          <li><a href="#">Sub Group 1</a></li>
          <li><a href="#">Sub Group 2</a></li>
          </ul>
    </li>


    5. How to add Sub-sub category :


    Say if you want to add sub-sub category inside "Group" in "Sub Group 1"  add the following code just above the closing tag </li> of "Sub Group 1" :

    <ul>
    <li><a href="#">Sub-Sub Group</a></li>
    </ul>

    Example :

    <li><a href="#">Group</a>
          <ul>
          <li><a href="#">Sub Group 1</a>

                <ul>
                <li><a href="#">Sub-Sub Group</a></li>
                </ul>

          </li>
          <li><a href="#">Sub Group 2</a></li>
          </ul>
    </li>


    Step 4. Again find the code </head> and place anyone of the following code just above it :


    jQuery menu for blogger 1


    <script src="//ajax.googleapis.com/ajax/libs/jquery/2.0.3/jquery.min.js" type="text/javascript"></script>
    <script type='text/javascript'>
        $(document).ready(function() {
            var str = location.href.toLowerCase();
            $('#navmenu ul li a').each(function() {
                if (str.indexOf(this.href.toLowerCase()) > -1) {
                    $("li a.highlight").removeClass("highlight");
                    $(this).addClass("highlight")
                }
            });

            $('#navmenu ul ul li a').each(function() {
            if ($(this).hasClass('highlight')){
            $(this).parent().parent().parent().children(':first-child').addClass('highlight');
            $(this).parent().addClass('highlights');
            } });

            $('#navmenu ul ul ul li a').each(function() {
            if ($(this).hasClass('highlight')){
            $(this).parent().parent().parent().parent().parent().children(':first-child').addClass('highlight');
            $(this).parent().parent().parent().addClass('highlights');
            $(this).parent().addClass('highlights');
            } });

            $("<span></span>").insertBefore("#navmenu ul ul ul");
            $("#navmenu ul ul ul").parent().find("a").css({
                "padding": "5px 28px 7px 16px"
            });

            $("#navmenu ul ul ul").hover(function() {
                $(this).prev().css("opacity", "0");
            }, function() {
                $(this).prev().css("opacity", "1");
            });
        });
    </script>


    <style type="text/css">
        #navmenu,
        #navmenu ul,
        #navmenu ul li,
        #navmenu ul ul,
        #navmenu ul ul li,
        #navmenu ul ul ul,
        #navmenu ul ul ul li {
            z-index: 1000;
        }
       
        #navmenu ul {
            margin: 0;
            padding: 0
        }
       
        #navmenu li {
            margin: 0;
            padding: 0
        }
       
        #navmenu a {
            margin: 0;
            padding: 0
        }
       
        #navmenu ul {
            list-style: none;
            overflow: visible;
        }
       
        #navmenu a {
            text-decoration: none
        }
       
        #navmenu {
            height: 70px;
            background-color: #232323;
            box-shadow: 0 2px 3px rgba(0, 0, 0, 0.4);
            width: auto;
        }
       
        #navmenu > ul > li {
            float: left;
            margin-left: 15px;
            position: relative
        }
       
        #navmenu > ul > li > a {
            color: #a0a0a0;
            font-family: Verdana, 'Lucida Grande';
            font-size: 15px;
            line-height: 70px;
            padding: 15px 20px;
            border: none;
            display: inline;
            -webkit-transition: color .15s;
            -moz-transition: color .15s;
            -o-transition: color .15s;
            transition: color .15s
        }
       
        #navmenu > ul > li > a:hover,
        #navmenu ul li a.highlight {
            color: #fff;
            background-color: #232323;
        }
       
        #navmenu > ul > li > ul {
            opacity: 0;
            visibility: hidden;
            padding: 16px 0 20px 0;
            background-color: #fafafa;
            text-align: left;
            position: absolute;
            top: 55px;
            left: 50%;
            margin-left: -90px;
            width: 180px;
            overflow: visible;
            border: none;
            -webkit-transition: all .3s .1s;
            -moz-transition: all .3s .1s;
            -o-transition: all .3s .1s;
            transition: all .3s .1s;
            -webkit-border-radius: 5px;
            -moz-border-radius: 5px;
            border-radius: 5px;
            -webkit-box-shadow: 0 1px 3px rgba(0, 0, 0, 0.4);
            -moz-box-shadow: 0 1px 3px rgba(0, 0, 0, 0.4);
            box-shadow: 0 1px 3px rgba(0, 0, 0, 0.4)
        }
       
        #navmenu > ul > li:hover > ul {
            opacity: 1;
            top: 65px;
            visibility: visible
        }
       
        #navmenu > ul > li > ul:before {
            content: '';
            display: block;
            border-color: transparent transparent #fafafa transparent;
            border-style: solid;
            border-width: 10px;
            position: absolute;
            top: -20px;
            left: 50%;
            margin-left: -10px
        }
       
        #navmenu > ul ul > li {
            position: relative;
            float: none;
        }
       
        #navmenu ul ul a {
            color: #323232;
            font-family: Verdana, 'Lucida Grande';
            font-size: 13px;
            background-color: #fafafa;
            padding: 5px 8px 7px 16px;
            display: block;
            border: none;
            -webkit-transition: background-color 0.1s;
            -moz-transition: background-color 0.1s;
            -o-transition: background-color 0.1s;
            transition: background-color 0.1s
        }
       
        #navmenu ul ul li:hover {
            background-color: #cc2c24;
        }
       
        #navmenu ul ul li:hover span {
            right: 10px;
            -webkit-transition: all .3s;
            -moz-transition: all .3s;
            -o-transition: all .3s;
            transition: all .3s;
        }
       
        #navmenu ul ul li:hover span::before {
            border-color: transparent transparent transparent #fff;
        }
       
        #navmenu ul ul ul {
            visibility: hidden;
            opacity: 0;
            position: absolute;
            top: -16px;
            left: 206px;
            padding: 16px 0 20px 0;
            background-color: #fafafa;
            text-align: left;
            width: 180px;
            border: none;
            -webkit-transition: all .3s;
            -moz-transition: all .3s;
            -o-transition: all .3s;
            transition: all .3s;
            -webkit-border-radius: 5px;
            -moz-border-radius: 5px;
            border-radius: 5px;
            -webkit-box-shadow: 0 1px 3px rgba(0, 0, 0, 0.4);
            -moz-box-shadow: 0 1px 3px rgba(0, 0, 0, 0.4);
            box-shadow: 0 1px 3px rgba(0, 0, 0, 0.4)
        }
       
        #navmenu ul ul > li:hover > ul {
            opacity: 1;
            left: 190px;
            visibility: visible
        }
       
        #navmenu ul ul a:hover {
            color: #f0f0f0;
            background-color: #cc2c24;
        }
       
        #navmenu ul ul span::before {
            content: '';
            display: block;
            border-color: transparent transparent transparent #000000;
            border-style: solid;
            border-width: 5px;
            position: absolute;
            z-index: 1001;
        }

        #navmenu ul ul li.highlights span::before {
            border-color: transparent transparent transparent #fff;
            }
       
        #navmenu ul ul span:hover::before {
            border-color: transparent transparent transparent #fafafa;
            -webkit-transition: all .3s;
            -moz-transition: all .3s;
            -o-transition: all .3s;
            transition: all .3s;
        }
       
        #navmenu ul ul span {
            position: absolute;
            right: 20px;
            top: 10px;
        }
    </style>


    jQuery menu for blogger 2


    <script src="//ajax.googleapis.com/ajax/libs/jquery/2.0.3/jquery.min.js" type="text/javascript"></script>
    <script type='text/javascript'>
        $(document).ready(function() {
            var str = location.href.toLowerCase();
            $('#navmenu ul li a').each(function() {
                if (str.indexOf(this.href.toLowerCase()) > -1) {
                    $("li a.highlight").removeClass("highlight");
                    $(this).addClass("highlight")
                }
            });

            $('#navmenu ul ul li a').each(function() {
            if ($(this).hasClass('highlight')){
            $(this).parent().parent().parent().children(':first-child').addClass('highlight');
            $(this).parent().addClass('highlights');
            } });

            $('#navmenu ul ul ul li a').each(function() {
            if ($(this).hasClass('highlight')){
            $(this).parent().parent().parent().parent().parent().children(':first-child').addClass('highlight');
            $(this).parent().parent().parent().addClass('highlights');
            $(this).parent().addClass('highlights');
            } });

            $("<span></span>").insertBefore("#navmenu ul ul ul");
            $("#navmenu ul ul ul").parent().find("a").css({
                "padding": "5px 28px 7px 16px"
            });

            $("#navmenu ul ul ul").hover(function() {
                $(this).prev().css("opacity", "0");
            }, function() {
                $(this).prev().css("opacity", "1");
            });
        });
    </script>


    <style type="text/css">
        #navmenu,
        #navmenu ul,
        #navmenu ul li,
        #navmenu ul ul,
        #navmenu ul ul li,
        #navmenu ul ul ul,
        #navmenu ul ul ul li {
            z-index: 1000;
        }
       
        #navmenu ul {
            margin: 0;
            padding: 0
        }
       
        #navmenu li {
            margin: 0;
            padding: 0
        }
       
        #navmenu a {
            margin: 0;
            padding: 0
        }
       
        #navmenu ul {
            list-style: none;
            overflow: visible;
        }
       
        #navmenu a {
            text-decoration: none
        }
       
        #navmenu {
            height: 50px;
            background-color: #265783;
            box-shadow: 0 2px 3px rgb(167, 205, 240);
            width: auto;
            border-bottom: 3px solid #214565;
        }
       
        #navmenu > ul > li {
            float: left;
            position: relative;
            border-right: 1px solid #214565;
        }
       
        #navmenu > ul > li > a {
            color: #fff;
            font-family: Verdana, 'Lucida Grande';
            font-size: 15px;
            line-height: 50px;
            padding: 15px 20px;
            border: none;
            display: inline;
            -webkit-transition: color .15s;
            -moz-transition: color .15s;
            -o-transition: color .15s;
            transition: color .15s
        }
       
        #navmenu > ul > li > a:hover,
        #navmenu ul li a.highlight {
            color: #fff;
            background-color: #214565;
        }
       
        #navmenu > ul > li > ul {
            opacity: 0;
            visibility: hidden;
            padding: 16px 0 20px 0;
            background-color: #fafafa;
            text-align: left;
            position: absolute;
            top: 70px;
            width: 180px;
            overflow: visible;
            border: none;
            -webkit-transition: all .3s .1s;
            -moz-transition: all .3s .1s;
            -o-transition: all .3s .1s;
            transition: all .3s .1s;
            -webkit-border-radius: 3px;
            -moz-border-radius: 3px;
            border-radius: 3px;
            -webkit-box-shadow: 0 1px 3px rgba(0, 0, 0, 0.4);
            -moz-box-shadow: 0 1px 3px rgba(0, 0, 0, 0.4);
            box-shadow: 0 1px 3px rgba(0, 0, 0, 0.4)
        }
       
        #navmenu > ul > li:hover > ul {
            opacity: 1;
            top: 50px;
            visibility: visible
        }
       
        #navmenu > ul > li > ul:before {
            content: '';
            display: block;
            border-color: transparent transparent #fafafa transparent;
            border-style: solid;
            border-width: 10px;
            position: absolute;
            top: -15px;
            left: 10%;
            margin-left: -10px
        }
       
        #navmenu > ul ul > li {
            position: relative;
            float: none;
        }
       
        #navmenu ul ul a {
            color: #323232;
            font-family: Verdana, 'Lucida Grande';
            font-size: 13px;
            background-color: #fafafa;
            padding: 5px 8px 7px 16px;
            display: block;
            border: none;
            -webkit-transition: background-color 0.1s;
            -moz-transition: background-color 0.1s;
            -o-transition: background-color 0.1s;
            transition: background-color 0.1s
        }
       
        #navmenu ul ul li:hover {
            background-color: #cc2c24;
        }
       
        #navmenu ul ul li:hover span {
            right: 10px;
            -webkit-transition: all .3s;
            -moz-transition: all .3s;
            -o-transition: all .3s;
            transition: all .3s;
        }
       
        #navmenu ul ul li:hover span::before {
            border-color: transparent transparent transparent #fff;
        }
       
        #navmenu ul ul ul {
            visibility: hidden;
            opacity: 0;
            position: absolute;
            top: -16px;
            left: 206px;
            padding: 16px 0 20px 0;
            background-color: #fafafa;
            text-align: left;
            width: 180px;
            border: none;
            -webkit-transition: all .3s;
            -moz-transition: all .3s;
            -o-transition: all .3s;
            transition: all .3s;
            -webkit-border-radius: 5px;
            -moz-border-radius: 5px;
            border-radius: 5px;
            -webkit-box-shadow: 0 1px 3px rgba(0, 0, 0, 0.4);
            -moz-box-shadow: 0 1px 3px rgba(0, 0, 0, 0.4);
            box-shadow: 0 1px 3px rgba(0, 0, 0, 0.4)
        }

        #navmenu ul ul ul::before {
            content: '';
            display: block;
            border-color: transparent #dbdbdb transparent transparent;
            border-style: solid;
            border-width: 10px;
            position: absolute;
            top: 20px;
            left: -20px;
        }
           
       
        #navmenu ul ul > li:hover > ul {
            opacity: 1;
            left: 190px;
            visibility: visible
        }
       
        #navmenu ul ul a:hover {
            color: #f0f0f0;
            background-color: #214565;
        }
       
        #navmenu ul ul span::before {
            content: '';
            display: block;
            border-color: transparent transparent transparent #000000;
            border-style: solid;
            border-width: 5px;
            position: absolute;
            z-index: 1001;
        }

        #navmenu ul ul li.highlights span::before {
            border-color: transparent transparent transparent #fff;
        }
       
        #navmenu ul ul span:hover::before {
            border-color: transparent transparent transparent #fafafa;
            -webkit-transition: all .3s;
            -moz-transition: all .3s;
            -o-transition: all .3s;
            transition: all .3s;
        }
       
        #navmenu ul ul span {
            position: absolute;
            right: 20px;
            top: 10px;
        }
    </style>


    jQuery menu for blogger 3


    <script src="//ajax.googleapis.com/ajax/libs/jquery/2.0.3/jquery.min.js" type="text/javascript"></script>
    <script type='text/javascript'>
        $(document).ready(function() {
            var str = location.href.toLowerCase();
            $('#navmenu ul li a').each(function() {
                if (str.indexOf(this.href.toLowerCase()) > -1) {
                    $("li a.highlight").removeClass("highlight");
                    $(this).addClass("highlight")
                }
            });

            $('#navmenu ul ul li a').each(function() {
            if ($(this).hasClass('highlight')){
            $(this).parent().parent().parent().children(':first-child').addClass('highlight');
            $(this).parent().addClass('highlights');
            } });

            $('#navmenu ul ul ul li a').each(function() {
            if ($(this).hasClass('highlight')){
            $(this).parent().parent().parent().parent().parent().children(':first-child').addClass('highlight');
            $(this).parent().parent().parent().addClass('highlights');
            $(this).parent().addClass('highlights');
            } });

            $("<span></span>").insertBefore("#navmenu ul ul ul");
            $("#navmenu ul ul ul").parent().find("a").css({
                "padding": "10px 28px 12px 16px"
            });

            $("#navmenu ul ul ul").hover(function() {
                $(this).prev().css("opacity", "0");
            }, function() {
                $(this).prev().css("opacity", "1");
            });
        });
    </script>


    <style type="text/css">
        #navmenu,
        #navmenu ul,
        #navmenu ul li,
        #navmenu ul ul,
        #navmenu ul ul li,
        #navmenu ul ul ul,
        #navmenu ul ul ul li {
            z-index: 1000;
        }
       
        #navmenu ul {
            margin: 0;
            padding: 0
        }
       
        #navmenu li {
            margin: 0;
            padding: 0
        }
       
        #navmenu a {
            margin: 0;
            padding: 0
        }
       
        #navmenu ul {
            list-style: none;
            overflow: visible;
        }
       
        #navmenu a {
            text-decoration: none
        }
       
        #navmenu {
            background: -webkit-linear-gradient(#f6f6f6, #e9eaea) repeat scroll 0 0 transparent;
            background: -moz-linear-gradient(#f6f6f6, #e9eaea) repeat scroll 0 0 transparent;
            background: linear-gradient(#f6f6f6, #e9eaea) repeat scroll 0 0 transparent;
            filter: progid:DXImageTransform.Microsoft.gradient( startColorstr='#f6f6f6', endColorstr='#e9eaea',GradientType=0 );
            height: 50px;
            box-shadow: 1px 1px 3px #C2C2C2;
            width: auto;
            border-radius: 0 0 3px 3px;
            -webkit-border-radius: 0 0 3px 3px;
            -moz-border-radius: 0 0 3px 3px;
        }
       
        #navmenu > ul > li {
            float: left;
            position: relative;
            border-right: 1px solid #CFCFCF;
        }
       
        #navmenu > ul > li > a {
            color: #000;
            font-family: Verdana, 'Lucida Grande';
            font-size: 15px;
            line-height: 50px;
            padding: 15px 20px;
            border: none;
            display: inline;
            -webkit-transition: color .15s;
            -moz-transition: color .15s;
            -o-transition: color .15s;
            transition: color .15s
        }
       
        #navmenu > ul > li > a:hover,
        #navmenu ul li a.highlight {
            color: #fff;
            background-color: #50A2EE;
        }
       
        #navmenu > ul > li > ul {
            opacity: 0;
            visibility: hidden;
            padding: 0px;
            background-color: #fafafa;
            text-align: left;
            position: absolute;
            top: 150px;
            width: 180px;
            overflow: visible;
            border: none;
            -webkit-transition: all .3s .1s;
            -moz-transition: all .3s .1s;
            -o-transition: all .3s .1s;
            transition: all .3s .1s;
            -webkit-border-radius: 5px;
            -moz-border-radius: 5px;
            border-radius: 5px;
            -webkit-box-shadow: 0 1px 3px rgba(0, 0, 0, 0.4);
            -moz-box-shadow: 0 1px 3px rgba(0, 0, 0, 0.4);
            box-shadow: 0 1px 3px rgba(0, 0, 0, 0.4)
        }
       
        #navmenu > ul > li:hover > ul {
            opacity: 1;
            top: 54px;
            visibility: visible
        }
       
        #navmenu > ul > li > ul:before {
            content: '';
            display: block;
            border-color: transparent transparent #fafafa transparent;
            border-style: solid;
            border-width: 15px;
            position: absolute;
            top: -25px;
            left: 10%;
            margin-left: -10px
        }
       
        #navmenu > ul ul > li {
            position: relative;
            float: none;
            border-bottom: 1px solid #ddd;
        }

        #navmenu ul ul a {
            color: #323232;
            font-family: Verdana, 'Lucida Grande';
            font-size: 13px;
            background-color: #fafafa;
            padding: 10px 8px 12px 16px;
            display: block;
            border: none;
            -webkit-transition: background-color 0.1s;
            -moz-transition: background-color 0.1s;
            -o-transition: background-color 0.1s;
            transition: background-color 0.1s
        }

        #navmenu ul ul li:first-child a, #navmenu ul ul ul li:first-child a {
            border-radius: 5px 5px 0 0;
            -webkit-border-radius: 5px 5px 0 0;
            -moz-border-radius: 5px 5px 0 0;
        }

        #navmenu ul ul li:last-child a, #navmenu ul ul ul li:last-child a {
            border-radius: 0 0 5px 5px;
            -webkit-border-radius: 0 0 5px 5px;
            -moz-border-radius: 0 0 5px 5px;
        }

        #navmenu ul ul li:last-child {
            border-bottom: 0px;
        }
       
        #navmenu ul ul li:hover span {
            -webkit-transform: rotate(90deg);
            -ms-transform:rotate(360deg);
            transform: rotate(90deg);
            -webkit-transition: all .3s;
            -moz-transition: all .3s;
            -o-transition: all .3s;
            transition: all .3s;
        }
       
        #navmenu ul ul ul {
            visibility: hidden;
            opacity: 0;
            position: absolute;
            top: 0px;
            left: 206px;
            padding: 0px;
            background-color: #fafafa;
            text-align: left;
            width: 180px;
            border: none;
            -webkit-transition: all .3s;
            -moz-transition: all .3s;
            -o-transition: all .3s;
            transition: all .3s;
            -webkit-border-radius: 5px;
            -moz-border-radius: 5px;
            border-radius: 5px;
            -webkit-box-shadow: 0 1px 3px rgba(0, 0, 0, 0.4);
            -moz-box-shadow: 0 1px 3px rgba(0, 0, 0, 0.4);
            box-shadow: 0 1px 3px rgba(0, 0, 0, 0.4)
        }

        #navmenu ul ul ul::before {
            content: '';
            display: block;
            border-color: transparent #dbdbdb transparent transparent;
            border-style: solid;
            border-width: 10px;
            position: absolute;
            top: 10px;
            left: -20px;
            z-index: 1000;
        }
           
       
        #navmenu ul ul > li:hover > ul {
            opacity: 1;
            left: 190px;
            visibility: visible
        }
       
        #navmenu ul ul a:hover {
            color: #f0f0f0;
            background-color: #00A2E8;
        }
       
        #navmenu ul ul span {
            background-image: url("https://4.bp.blogspot.com/-Odm4GB62Eno/Vy9sfmXdRDI/AAAAAAAAAn4/4O95b1gxOQ8Vzss-iOznxkcik5BCcHzBgCLcB/s1600/hbz-arrow.png");
            border-radius: 50%;
            -webkit-border-radius: 50%;
            -moz-border-radius: 50%;
            position: absolute;
            right: 20px;
            top: 10px;
            width: 18px;
            height: 18px;
        }
    </style>


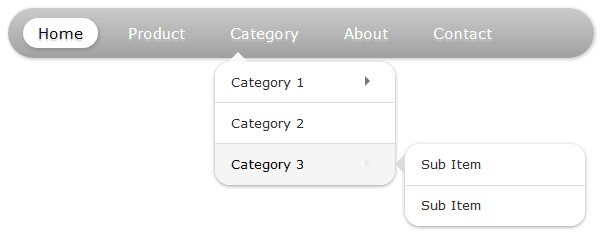
    jQuery menu for blogger 4

    <script src="//ajax.googleapis.com/ajax/libs/jquery/2.0.3/jquery.min.js" type="text/javascript"></script>
    <script type='text/javascript'>
        $(document).ready(function() {
            var str = location.href.toLowerCase();
            $('#navmenu ul li a').each(function() {
                if (str.indexOf(this.href.toLowerCase()) > -1) {
                    $("li a.highlight").removeClass("highlight");
                    $(this).addClass("highlight")
                }
            });

            $('#navmenu ul ul li a').each(function() {
            if ($(this).hasClass('highlight')){
            $(this).parent().parent().parent().children(':first-child').addClass('highlight');
            $(this).parent().addClass('highlights');
            } });

            $('#navmenu ul ul ul li a').each(function() {
            if ($(this).hasClass('highlight')){
            $(this).parent().parent().parent().parent().parent().children(':first-child').addClass('highlight');
            $(this).parent().parent().parent().addClass('highlights');
            $(this).parent().addClass('highlights');
            } });

            $("<span></span>").insertBefore("#navmenu ul ul ul");
            $("#navmenu ul ul ul").parent().find("a").css({
                "padding": "10px 28px 12px 16px"
            });

            $("#navmenu ul ul ul").hover(function() {
                $(this).prev().css("opacity", "0");
            }, function() {
                $(this).prev().css("opacity", "1");
            });
        });
    </script>


    <style type="text/css">
        #navmenu,
        #navmenu ul,
        #navmenu ul li,
        #navmenu ul ul,
        #navmenu ul ul li,
        #navmenu ul ul ul,
        #navmenu ul ul ul li {
            z-index: 1000;
        }
       
        #navmenu ul {
            margin: 0;
            padding: 0
        }
       
        #navmenu li {
            margin: 0;
            padding: 0
        }
       
        #navmenu a {
            margin: 0;
            padding: 0
        }
       
        #navmenu ul {
            list-style: none;
            overflow: visible;
        }
       
        #navmenu a {
            text-decoration: none
        }
       
        #navmenu {
            background: -webkit-linear-gradient(#cbcbcb, #a1a1a1) repeat scroll 0 0 transparent;
            background: -moz-linear-gradient(#cbcbcb, #a1a1a1) repeat scroll 0 0 transparent;
            background: linear-gradient(#cbcbcb, #a1a1a1) repeat scroll 0 0 transparent;
            filter: progid:DXImageTransform.Microsoft.gradient( startColorstr='#cbcbcb', endColorstr='#a1a1a1',GradientType=0 );
            height: 50px;
            box-shadow: 1px 1px 3px #C2C2C2;
            width: auto;
            border-radius: 30px;
            -webkit-border-radius: 30px;
            -moz-border-radius: 30px;

        }
       
        #navmenu > ul > li {
            float: left;
            position: relative;
            margin-left: 15px;
        }
       
        #navmenu > ul > li > a {
            color: #fff;
            font-family: Verdana, 'Lucida Grande';
            font-size: 15px;
            line-height: 50px;
            padding: 5px 15px;
            border: none;
            border-radius: 30px;
            -webkit-border-radius: 30px;
            -moz-border-radius: 30px;
            text-shadow: 0px 2px 1px #C6C6C6;
            display: inline;
            -webkit-transition: color .15s;
            -moz-transition: color .15s;
            -o-transition: color .15s;
            transition: color .15s
        }
       
        #navmenu > ul > li > a:hover,
        #navmenu ul li a.highlight {
            color: #000;
            background-color: #fff;
            box-shadow: 1px 2px 3px #8d8d8d;
        }
       
        #navmenu ul ul a.highlight {
            background-color: #F5F5F5;
        }

        #navmenu > ul > li > ul {
            opacity: 0;
            visibility: hidden;
            padding: 0px;
            background-color: #fafafa;
            text-align: left;
            position: absolute;
            top: 54px;
            width: 180px;
            overflow: visible;
            border: none;
            -webkit-transition: all .3s .1s;
            -moz-transition: all .3s .1s;
            -o-transition: all .3s .1s;
            transition: all .3s .1s;
            -webkit-border-radius: 15px;
            -moz-border-radius: 15px;
            border-radius: 15px;
            -webkit-box-shadow: 0 1px 3px rgba(0, 0, 0, 0.4);
            -moz-box-shadow: 0 1px 3px rgba(0, 0, 0, 0.4);
            box-shadow: 0 1px 3px rgba(0, 0, 0, 0.4)
        }
       
        #navmenu > ul > li:hover > ul {
            opacity: 1;
            top: 54px;
            visibility: visible
        }
       
        #navmenu > ul > li > ul:before {
            content: '';
            display: block;
            border-color: transparent transparent #fafafa transparent;
            border-style: solid;
            border-width: 15px;
            position: absolute;
            top: -25px;
            left: 10%;
            margin-left: -10px
        }
       
        #navmenu > ul ul > li {
            position: relative;
            float: none;
            border-bottom: 1px solid #ddd;
        }

        #navmenu ul ul a {
            color: #323232;
            font-family: Verdana, 'Lucida Grande';
            font-size: 13px;
            background-color: #fff;
            padding: 10px 8px 12px 16px;
            display: block;
            border: none;
            -webkit-transition: background-color 0.1s;
            -moz-transition: background-color 0.1s;
            -o-transition: background-color 0.1s;
            transition: background-color 0.1s
        }

        #navmenu ul ul li:first-child a, #navmenu ul ul ul li:first-child a {
            border-radius: 15px 15px 0 0;
            -webkit-border-radius: 15px 15px 0 0;
            -moz-border-radius: 15px 15px 0 0;
        }

        #navmenu ul ul li:last-child a, #navmenu ul ul ul li:last-child a {
            border-radius: 0 0 15px 15px;
            -webkit-border-radius: 0 0 15px 15px;
            -moz-border-radius: 0 0 15px 15px;
        }

        #navmenu ul ul li:last-child {
            border-bottom: 0px;
        }
       
        #navmenu ul ul li:hover span {  
            animation: fade 1s forwards;
            -webkit-animation: fade 1s forwards;
            -moz-animation: fade 1s forwards;
            -o-animation: fade 1s forwards;
            animation-iteration-count: infinite;
            -webkit-animation-iteration-count: infinite;
            -moz-animation-iteration-count: infinite; 
            -o-animation-iteration-count: infinite;
        }
       
        @keyframes fade {
            0%   {opacity:0;}
            50%   {opacity:1;}
            100% {opacity:0;}
        }

        @-webkit-keyframes fade {
            0%   {opacity:0;}
            50%   {opacity:1;}
            100% {opacity:0;}
        }

        @-moz-keyframes fade {
            0%   {opacity:0;}
            50%   {opacity:1;}
            100% {opacity:0;}
        }

        @-o-keyframes fade {
            0%   {opacity:0;}
            50%   {opacity:1;}
            100% {opacity:0;}
        }

        #navmenu ul ul ul {
            visibility: hidden;
            opacity: 0;
            position: absolute;
            top: 0px;
            left: 206px;
            padding: 0px;
            background-color: #fafafa;
            text-align: left;
            width: 180px;
            border: none;
            -webkit-transition: all .3s;
            -moz-transition: all .3s;
            -o-transition: all .3s;
            transition: all .3s;
            -webkit-border-radius: 15px;
            -moz-border-radius: 15px;
            border-radius: 15px;
            -webkit-box-shadow: 0 1px 3px rgba(0, 0, 0, 0.4);
            -moz-box-shadow: 0 1px 3px rgba(0, 0, 0, 0.4);
            box-shadow: 0 1px 3px rgba(0, 0, 0, 0.4)
        }

        #navmenu ul ul ul::before {
            content: '';
            display: block;
            border-color: transparent #dbdbdb transparent transparent;
            border-style: solid;
            border-width: 10px;
            position: absolute;
            top: 10px;
            left: -20px;
            z-index: 1000;
        }
           
       
        #navmenu ul ul > li:hover > ul {
            opacity: 1;
            left: 190px;
            visibility: visible
        }
       
        #navmenu ul ul a:hover {
            color: #000;
            background-color: #F5F5F5;
        }
       
        #navmenu ul ul span {
            border-color: transparent transparent transparent #777;
            border-style: solid;
            border-width: 5px;
            display: block;
            position: absolute;
            right: 20px;
            top: 14px;
        }
    </style>


    jQuery menu for blogger 5


    <script src="//ajax.googleapis.com/ajax/libs/jquery/2.0.3/jquery.min.js" type="text/javascript"></script>
    <script type='text/javascript'>
        $(document).ready(function() {
            var str = location.href.toLowerCase();
            $('#navmenu ul li a').each(function() {
                if (str.indexOf(this.href.toLowerCase()) > -1) {
                    $("li a.highlight").removeClass("highlight");
                    $(this).addClass("highlight")
                }
            });

            $("<span></span>").insertBefore("#navmenu ul ul ul");
            $("#navmenu ul ul ul").parent().find("a").css({
                "padding": "5px 28px 7px 16px"
            });

            $("#navmenu ul ul ul").hover(function() {
                $(this).prev().css("opacity", "0");
            }, function() {
                $(this).prev().css("opacity", "1");
            });

            $("#navmenu ul ul").hover(function() {
                $(this).prev().addClass("highlightz");
            }, function() {
                $(this).prev().removeClass("highlightz");
            });

            function getRandomClass() {
               var classes = new Array("a", "b", "c", "d", "e", "f");
       
               var randomNumber = Math.floor(Math.random()*7);

               return classes[randomNumber];
            };
            $("#navmenu ul ul li:has(ul)").hover(function() {
               var randomClass = getRandomClass();
               $(this).attr("class", randomClass);
            });

            $('#navmenu ul ul ul li a').each(function() {
              if ($(this).hasClass('highlight')){
                  $(this).removeClass('highlight');
                  $(this).parent().parent().parent().parent().parent().children(':first-child').addClass('highlight');
              }
            });

            $('#navmenu ul ul li a').each(function() {
              if ($(this).hasClass('highlight')){
                  $(this).removeClass('highlight');
                  $(this).parent().parent().parent().children(':first-child').addClass('highlight');
              }
            });


        });
    </script>


    <style type="text/css">


        #navmenu ul ul li.a:hover a, #navmenu ul ul li.a:hover ul {
            background-color: #65834C;
            color: #fff;
        }


        #navmenu ul ul li.b:hover a, #navmenu ul ul li.b:hover ul {
            background-color: #4F4C83;
            color: #fff;
        }

        #navmenu ul ul li.c:hover a, #navmenu ul ul li.c:hover ul {
            background-color: #4C7983;
            color: #fff;
        }

        #navmenu ul ul li.d:hover a, #navmenu ul ul li.d:hover ul {
            background-color: #834C4C;
            color: #fff;
        }

        #navmenu ul ul li.e:hover a, #navmenu ul ul li.e:hover ul {
            background-color: #4D6899;
            color: #fff;
        }

        #navmenu ul ul li.f:hover a, #navmenu ul ul li.f:hover ul {
            background-color: #97944C;
            color: #fff;
        }

        #navmenu ul ul ul a:hover {
           text-decoration: underline;
        }

        #navmenu,
        #navmenu ul,
        #navmenu ul li,
        #navmenu ul ul,
        #navmenu ul ul li,
        #navmenu ul ul ul,
        #navmenu ul ul ul li {
            z-index: 1000;
        }
       
        #navmenu ul {
            margin: 0;
            padding: 0
        }
       
        #navmenu li {
            margin: 0;
            padding: 0
        }
       
        #navmenu a {
            margin: 0;
            padding: 0
        }
       
        #navmenu ul {
            list-style: none;
            overflow: visible;
        }
       
        #navmenu a {
            text-decoration: none
        }
       
        #navmenu {
            height: 50px;
            background-color: #384959;
            box-shadow: 0 0 3px rgb(206, 206, 206);
            width: auto;
        }
       
        #navmenu > ul > li {
            float: left;
            position: relative;
        }
       
        #navmenu > ul > li > a {
            color: #fff;
            font-family: Verdana, 'Lucida Grande';
            font-size: 15px;
            line-height: 50px;
            padding: 15px 20px;
            border: none;
            display: inline;
            -webkit-transition: color .15s;
            -moz-transition: color .15s;
            -o-transition: color .15s;
            transition: color .15s
        }
       

        #navmenu > ul > li > a:hover,
        #navmenu ul li a.highlight,
        #navmenu .highlightz {
            color: #000;
            background-color: #fff;
        }

        #navmenu > ul > li > ul {
            opacity: 0;
            visibility: hidden;
            padding: 16px 0 20px 0;
            background-color: #fff;
            text-align: left;
            position: absolute;
            width: 180px;
            overflow: visible;
            border: none;
            -webkit-transition: all .3s .1s;
            -moz-transition: all .3s .1s;
            -o-transition: all .3s .1s;
            transition: all .3s .1s;
            -webkit-box-shadow: 0 3px 3px rgba(0, 0, 0, 0.4);
            -moz-box-shadow: 0 3px 3px rgba(0, 0, 0, 0.4);
            box-shadow: 0 3px 3px rgba(0, 0, 0, 0.4)
        }
       
        #navmenu > ul > li:hover > ul {
            opacity: 1;
            visibility: visible
        }
       
        #navmenu > ul ul > li {
            position: relative;
            float: none;
        }
       
        #navmenu ul ul a {
            color: #323232;
            font-family: Verdana, 'Lucida Grande';
            font-size: 13px;
            background-color: #fff;
            padding: 5px 8px 7px 16px;
            display: block;
            border: none;
            -webkit-transition: background-color 0.1s;
            -moz-transition: background-color 0.1s;
            -o-transition: background-color 0.1s;
            transition: background-color 0.1s
        }
       
        #navmenu ul ul li:hover {
            background-color: #cc2c24;
        }
       
        #navmenu ul ul li:hover span {
            right: 10px;
            -webkit-transition: all .3s;
            -moz-transition: all .3s;
            -o-transition: all .3s;
            transition: all .3s;
        }
       
        #navmenu ul ul li:hover span::before {
            border-color: transparent transparent transparent #fff;
        }
       
        #navmenu ul ul ul {
            visibility: hidden;
            opacity: 0;
            position: absolute;
            top: -16px;
            left: 180px;
            padding: 16px 0 20px 0;
            background-color: #fff;
            text-align: left;
            width: 180px;
            border: none;
            -webkit-transition: all .3s;
            -moz-transition: all .3s;
            -o-transition: all .3s;
            transition: all .3s;
            -webkit-box-shadow: 0 0 3px rgba(0, 0, 0, 0.1);
            -moz-box-shadow: 0 0 3px rgba(0, 0, 0, 0.1);
            box-shadow: 0 0 3px rgba(0, 0, 0, 0.1);
            z-index: 1000;
        }
           
       
        #navmenu ul ul > li:hover > ul {
            opacity: 1;
            visibility: visible
        }
       
        #navmenu ul ul a:hover {
            color: #f0f0f0;
            background-color: #214565;
        }
       
        #navmenu ul ul span::before {
            content: '';
            display: block;
            border-color: transparent transparent transparent #000000;
            border-style: solid;
            border-width: 5px;
            position: absolute;
            z-index: 1001;
        }

        #navmenu ul ul li.highlights span::before {
            border-color: transparent transparent transparent #fff;
        }
       
        #navmenu ul ul span:hover::before {
            border-color: transparent transparent transparent #fafafa;
            -webkit-transition: all .3s;
            -moz-transition: all .3s;
            -o-transition: all .3s;
            transition: all .3s;
        }
       
        #navmenu ul ul span {
            position: absolute;
            right: 20px;
            top: 10px;
        }
    </style>


    Step 4. Click Save template.

    That's all !

    Refresh your blog to see stylish horizontal jquery menu with highlighter. For any issues related to above tutorial comment below. Stay Updated, Browse Howbloggerz ! :)
    Read more ...