By default Blogger creates a link to the image whenever an image is uploaded to a Blogger post. Sometimes, however, you might want to remove the link to prevent the image from being clickable. A common reason would be to safeguard your image. If you are worried about your image being copied you can prevent it from appearing full size by disabling the link. When you remove the hyperlink off an image from your post, your post image won't be clickable anymore, preventing readers from accessing the larger version of the image.
 If you are using a custom Blogger template, then you probably have noticed that few of the third-party developed templates does not supports Lightbox functionality, which causes images to be opened in a new tab window whenever they are clicked by the users. Since, Blogger use Picasa web album to host your blog’s images, so whenever user clicks on an image present on your site it ultimately takes them to a different destination, which causes increase in the bounce rate and decrease in the ad sales because your users are not converting they are coming from one end and leaving from the other.
Recently, one of our users asked us that How to Remove Hyperlinks from Post Images in Blogger? The easiest way to remove hyperlinks for post images in blogger is to simply revert to the HTML Tab in the blogger post editor and remove the hyperlink <a href>. However, what if you have to edit large numbers of posts? don't worry, we have prepared set of codes with CSS and JavaScript tweak, not HTML one to automatically remove links. Today in this tutorial, we will show you How to manually or automatically Remove Hyperlinks from single Post image or from Homepage page / Specific post / Specific page / or from all posts in blogger with step by step instructions and images.
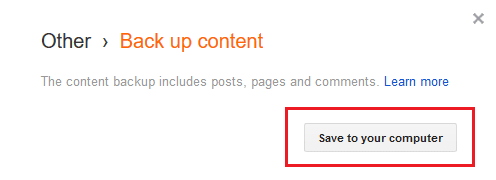
If you just want to disable the hyperlink from a single image in Blogger try this method. I have found that it removes the link but it will not reinstate it once removed so be sure you want to remove the link before you start otherwise you will need to reinstate the link manually. I suggest you backup before you start.
Step 2. Make sure Compose is selected, then select the picture and then click on Link in Toolbar.

Step 3. Click on Publish / Update.
Step 2. Make sure HTML is selected, then Find the image hyperlink code.
Note : Their may be more than one Image hyperlink depends upon the number of images in post. Code may vary little because every image have different URL.
Code look like this :
Step 3. Now remove the hyperlink around the img tag ( Blue color code ).
Step 4. Click on Publish / Update.
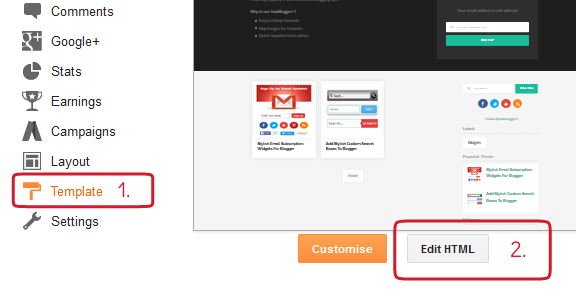
Step 1. Login to your blogger account, then navigate to Template > Edit HTML.
Step 2. Click anywhere inside the code and search for following code ( CTRL+F ) :
Step 3. Copy and paste the following code just above it to disable Hyperlinks from :
Step 4. Configuration for Specific post and page only :
Replace URL-HERE with the page / post URL. For example :
If your post URL is : http://www.howbloggerz.blogspot.com/2016/04/removing-hyperlinks-from-blogger-post-images.html
Then add only : 2016/04/removing-hyperlinks-from-blogger-post-images.html
OR
If your page URL is : http://www.howbloggerz.blogspot.com/p/write-for-us.html
Then add only : p/write-for-us.html
Step 5. Click Save Template.
Read more ...
Recently, one of our users asked us that How to Remove Hyperlinks from Post Images in Blogger? The easiest way to remove hyperlinks for post images in blogger is to simply revert to the HTML Tab in the blogger post editor and remove the hyperlink <a href>. However, what if you have to edit large numbers of posts? don't worry, we have prepared set of codes with CSS and JavaScript tweak, not HTML one to automatically remove links. Today in this tutorial, we will show you How to manually or automatically Remove Hyperlinks from single Post image or from Homepage page / Specific post / Specific page / or from all posts in blogger with step by step instructions and images.
Removing Hyperlinks from Posts Images
If you just want to disable the hyperlink from a single image in Blogger try this method. I have found that it removes the link but it will not reinstate it once removed so be sure you want to remove the link before you start otherwise you will need to reinstate the link manually. I suggest you backup before you start.
Removing Hyperlinks Manually / from Single Image
1. By Using Blogger Compose Editor Toolbar ( Easy )
Step 1. Login to your blogger account, then navigate to edit post ( From which you want to remove image hyperlink ).Step 2. Make sure Compose is selected, then select the picture and then click on Link in Toolbar.
Step 3. Click on Publish / Update.
2. By Using Blogger Post HTML Editor
Step 1. Login to your blogger account, then navigate to edit post ( From which you want to remove image hyperlink ).Step 2. Make sure HTML is selected, then Find the image hyperlink code.
Note : Their may be more than one Image hyperlink depends upon the number of images in post. Code may vary little because every image have different URL.
Code look like this :
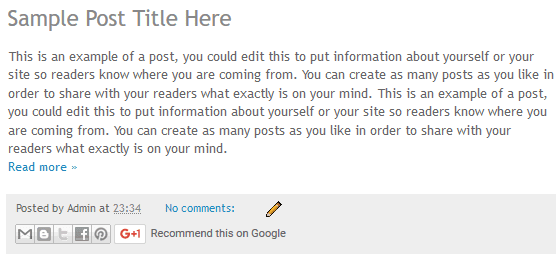
<a href="https://4.bp.blogspot.com/-pqkPpEx7KNY/VxYXv655rRI/AAAAAAAAAmk/HCKXZFHvtCobFrpozByEUuclA7MAjEBYQCKgB/s1600/Vintage-Camera.jpg" imageanchor="1" style="margin-left: 1em; margin-right: 1em;"><img border="0" height="180" src="https://4.bp.blogspot.com/-pqkPpEx7KNY/VxYXv655rRI/AAAAAAAAAmk/HCKXZFHvtCobFrpozByEUuclA7MAjEBYQCKgB/s320/Vintage-Camera.jpg" width="320" /></a>
Step 3. Now remove the hyperlink around the img tag ( Blue color code ).
<a href="https://4.bp.blogspot.com/-pqkPpEx7KNY/VxYXv655rRI/AAAAAAAAAmk/HCKXZFHvtCobFrpozByEUuclA7MAjEBYQCKgB/s1600/Vintage-Camera.jpg" imageanchor="1" style="margin-left: 1em; margin-right: 1em;"><img border="0" height="180" src="https://4.bp.blogspot.com/-pqkPpEx7KNY/VxYXv655rRI/AAAAAAAAAmk/HCKXZFHvtCobFrpozByEUuclA7MAjEBYQCKgB/s320/Vintage-Camera.jpg" width="320" /></a>
Step 4. Click on Publish / Update.
Removing Hyperlinks Automatically From Post Images
Step 1. Login to your blogger account, then navigate to Template > Edit HTML.
Step 2. Click anywhere inside the code and search for following code ( CTRL+F ) :
</head>
Step 3. Copy and paste the following code just above it to disable Hyperlinks from :
<b:if cond='data:blog.pageType == "item"'>
<script src='http://ajax.googleapis.com/ajax/libs/jquery/2.0.3/jquery.min.js' type='text/javascript'></script>
<script type="text/javascript">
$(document).ready(function() {
$('.post-body a[href]:has(img)').css({"cursor": "default" , "pointer-events": "none" , "-webkit-user-select": "none" , "-khtml-user-select": "none" , "-moz-user-select": "none" , "-o-user-select": "none" , "user-select": "none"})
.click(function() { return false; });
});
</script>
</b:if>
<b:if cond='data:blog.url == data:blog.homepageUrl'>
<script src='http://ajax.googleapis.com/ajax/libs/jquery/2.0.3/jquery.min.js' type='text/javascript'></script>
<script type="text/javascript">
$(document).ready(function() {
$('.post-body a[href]:has(img)').css({"cursor": "default" , "pointer-events": "none" , "-webkit-user-select": "none" , "-khtml-user-select": "none" , "-moz-user-select": "none" , "-o-user-select": "none" , "user-select": "none"})
.click(function() { return false; });
});
</script>
</b:if>
<b:if cond='data:blog.pageType == "static_page"'>
<script src='http://ajax.googleapis.com/ajax/libs/jquery/2.0.3/jquery.min.js' type='text/javascript'></script>
<script type="text/javascript">
$(document).ready(function() {
$('.post-body a[href]:has(img)').css({"cursor": "default" , "pointer-events": "none" , "-webkit-user-select": "none" , "-khtml-user-select": "none" , "-moz-user-select": "none" , "-o-user-select": "none" , "user-select": "none"})
.click(function() { return false; });
});
</script>
</b:if>
<b:if cond='data:blog.url == data:blog.canonicalHomepageUrl + "URL-HERE"'>
<script src='http://ajax.googleapis.com/ajax/libs/jquery/2.0.3/jquery.min.js' type='text/javascript'></script>
<script type="text/javascript">
$(document).ready(function() {
$('.post-body a[href]:has(img)').css({"cursor": "default" , "pointer-events": "none" , "-webkit-user-select": "none" , "-khtml-user-select": "none" , "-moz-user-select": "none" , "-o-user-select": "none" , "user-select": "none"})
.click(function() { return false; });
});
</script>
</b:if>
Step 4. Configuration for Specific post and page only :
Replace URL-HERE with the page / post URL. For example :
If your post URL is : http://www.howbloggerz.blogspot.com/2016/04/removing-hyperlinks-from-blogger-post-images.html
Then add only : 2016/04/removing-hyperlinks-from-blogger-post-images.html
OR
If your page URL is : http://www.howbloggerz.blogspot.com/p/write-for-us.html
Then add only : p/write-for-us.html
Step 5. Click Save Template.