Wednesday, 24 February 2016

How To Add Twitter Cards Meta Tags To Blogger

The Twitter cards meta tags were the social media meta tags for Twitter which enable any webpage of your blog to become a rich object in social graph. In short when someone tweet your blog post, the tweeted item looks better on Twitter. It works as Facebook Open Graph works for Facebook posts. For example :

If you posted a link of any of your post on Twitter without setting up Twitter cards tags,
it will look like this :

how to add twitter cards to blogger
twitter tweets without twitter cards blogger


Which is not an impressive piece of content. A social media user cancel this instead of tweeting it, But after adding the Twitter cards meta tags it looks like this :


twitter tweets with twitter cards blogger


This is more likely to get clicked and Tweeted by users, so if you want to add, implement or setup Twitter cards social media meta tags to your blogger just follow the given step by step tutorial with images :


Note : If you have already added Facebook open graph tags in your blogger, then you have to add only basic tags because twitter can fetch data from open graph tags except few.

Steps : How To Add Open Twitter Cards Tags To Blogger


Option 1 : If you have already added Open Graph tags for Facebook.


Step 1. Log in to your Blogger account, then go to Dashboard > Template > Edit HTML.


Edit blogger template


Step 2. Click anywhere inside the Template code, then search for the following code ( CTRL+F ) :


<head>


Step 3. Add this code just below it.


<meta content='summary_large_image' name='twitter:card'/>
<meta content='@your-name' name='twitter:site'/>
<meta content='@your-name' name='twitter:creator'/>


adding twitter cards tags to blogger


Step 4. Configuration of Twitter cards tags :


  • Replace your-name with your name or with your blog title.
  • ( Optional ) Change summary_large_image with the type of twitter card.

Types of Twitter card :


  • summary: Default Card, including a title, description, thumbnail, and Twitter account attribution.
  •  summary_large_image: Similar to a Summary Card, but with a prominently featured image ( Recommended ). For more info click here.


Step 5. Click on Save Template.


Option 2 : If you have not added Open Graph tags for Facebook.


Step 1. Log in to your Blogger account, then go to Dashboard > Template > Edit HTML.


Edit blogger template


Step 2. Click anywhere inside the Template code, then search for the following code ( CTRL+F ) :


<head>


Step 3. Add this code just below it.


<meta content='summary_large_image' name='twitter:card'/>
<meta content='@your-name' name='twitter:site'/>
<b:switch var='data:blog.pageType'>
<b:case value='index'/>
<meta expr:content='data:blog.pageTitle' name='twitter:title'/>
<b:default/>
<meta expr:content='data:blog.pageName' name='twitter:title'/>
</b:switch>
<b:if cond='data:blog.metaDescription != &quot;&quot;'>
<meta expr:content='data:blog.metaDescription' name='twitter:description'/>
</b:if>
<meta content='@your-name' name='twitter:creator'/>
<b:switch var='data:blog.pageType'>
<b:case value='item'/>
<meta expr:content='data:blog.postImageUrl' name='twitter:image'/>
<b:default/>
<meta content='img-url-for-home-page' name='twitter:image'/>
</b:switch>


adding twitter cards meta tags to blogger


Step 4. Configuration of Twitter cards tags :


  • Replace your-name with your name or with your blog title.
  • ( Optional ) Change summary_large_image with the type of twitter card.
  • Replace img-url-for-home-page with url of the image you want to show for homepage.

Types of Twitter card :


  • summary: Default Card, including a title, description, thumbnail, and Twitter account attribution.
  •  summary_large_image: Similar to a Summary Card, but with a prominently featured image ( Recommended ). For more info click here.


Step 6. Click Save template.


Enjoy !


Now you will see optimized Title, description, image etc on your Twitter tweet linked with your blogger. If you have any issue use Twitter card Validator . Still not resolved comment below. Stay Updated, Browse Howbloggerz ! :)
Read more ...

Tuesday, 23 February 2016

Add Open Graph Tags To Blogger (with Images)

Updated on: March 12, 2017

The Open Graph meta tags were the social media meta tags for Facebook. These tags help you to make your blog post a rich object in the social media world. In short, when someone shares your blog post, the shared item looks better on Facebook. It works as Twitter card for twitter works.

If you share your post on Facebook without setting up open graph tags, it will look like this:

Facebook Open graph tags for blogger
Facebook post without open graph blogger

Which is not an impressive piece of content. Most probably a social media user will ignore this, instead of sharing or clicking it, But if you add the Facebook open graph meta tags, your posts will looks like this:

Facebook post with open graph tags blogger

This is more likely to get clicked and shared by users, so if you want to setup Facebook's open graph social media meta tags protocol to your blogger just follow the given step by step instructions with images.

Those users who get a wrong image (or a wrench img) on sharing the post on Facebook should also follow the given steps.

How To Implement Open Graph Meta Tags in Blogger

Step 1. Log in to your Blogger account, then goto Themes > Edit HTML.

Edit Blogger Theme

Step 2. Click anywhere inside the code, and then search for the following code (Use CTRL+F):

<html

Step 3. Add below code at the end of searched code before close tag '>'.

xmlns:og='http://ogp.me/ns#'
Add open graph in blogger

Step 4. Again search for the following code:

<b:include data='blog' name='all-head-content'/>

Step 5. Add this code just below it:

<meta content='article' property='og:type'/>
<b:if cond='data:blog.url == data:blog.homepageUrl'>
<meta content='[homepage Image URL]' property='og:image'/>
<meta content='[homepage Image Width]' property='og:image:width' />
<meta content='[homepage Image Height]' property='og:image:height' />
</b:if>
<meta expr:content='data:blog.title' property='og:site_name'/>
<meta content='[Facebook profile Id]' property='fb:admins'/>
<b:if cond='data:blog.pageType == "item"'>
<meta content='https://www.facebook.com/username' property='article:author'/>
</b:if>
<meta content='en_US' property='og:locale'/>

Note: Open graph Tags for post "URL", "image", "description" and "title" are already there by default, so no need to add them again.

Step 5. Configuration:

Note: Recommended Image dimensions for better output in Facebook post: 1200 x 630px

  • Replace [homepage Image URL] with the URL of the image for homepage.
  • Replace [homepage Image Width] with the Width of the homepage Image.
  • Replace [homepage Image Height] with the Height of the homepage Image.
    For Height and Width, Use only numeric value like '1200' or '630')
  • Note: This image will be shown when you will share your main blog address or homepage on Facebook.

    Read: How to Upload and Get Image URL

  • Replace [Facebook profile Id] with your Facebook profile id. To get your profile id Click here.
  • Replace username with your Facebook username.
  • To find your username visit your Facebook profile, Then check your address bar.
    It’ll look like https://www.facebbok.com/username

    If you have not set the username yet it may look like:
    https://www.facebook.com/profile.php?id=some-random-number
    You can replace the above URL with this or you can create your username by visiting your Facebook's settings.

  • (Optional) Here en_US is the language_TERRITORY that is US-English if your blog is in different language replace it. For language code details click here .

Step 6. Click Save theme.

That's it !

Now, your shared post on Facebook will become a rich object with beautiful appearance. You can also setup Twitter card in the same way. If you have any issue use Facebook open graph, Use this Facebook Debugging tool or comment below. Stay Updated, Browse Howbloggerz! :)

Read more ...

Monday, 22 February 2016

Remove, Change Showing Posts With Label in Blogger

Updated on: January 5, 2017

Whenever a user click on a post label link or search your blog, by default your blogger template shows the message "Showing posts with label "Label". Show all posts" for labels and "Showing posts sorted by relevance for query "Query". Sort by date Show all posts" for search results at the top of the page. This is quite frustrating and many of you want to delete this message or change this message.

remove, change showing posts with label in blogger
Showing posts with label Show all posts

Unfortunately Blogger does not provide any way to customize this message but there are another ways to remove or change this status message from your blogspot. So, I have created tutorial for it. If you want to either remove or change the message, just follow the given step by step instructions (with images).

How to Remove "Showing posts with label ... Show all posts"

Option 1: By Editing Blogger Template

Step 1. Login to your Blogger account, then go to Template > Edit HTML.

Edit HTML Template

Step 2. Click anywhere inside the Template code, then search for the following code ( CTRL+F ):

<b:includable id='status-message'>
Delete showing posts with label message from blogger

Step 3. After expanding, Remove the code Given Below (with first line):

     <b:includable id='status-message'>
      <b:if cond='data:navMessage'>
      <div class='status-msg-wrap'>
        <div class='status-msg-body'>
          <data:navMessage/>
        </div>
        <div class='status-msg-border'>
          <div class='status-msg-bg'>
            <div class='status-msg-hidden'><data:navMessage/></div>
          </div>
        </div>
      </div>
      <div style='clear: both;'/>
      </b:if>
    </b:includable>
How to change showing posts with label in blogspot

Step 4. Replace the Removed Code with this code:

<b:includable id='status-message'>
<b:if cond='data:navMessage'>
<div>
</div>
<div style='clear: both;'/>
</b:if>
</b:includable>

Step 5. Click on Save template.

Option 2: By Using CSS

Step 1. Login to your Blogger account, then go to Template > Edit HTML.

Edit HTML Template

Step 2. Click anywhere inside the Template code, then search for the following code ( CTRL+F ):

]]></b:skin>

Step 3. Place this code just above it.

.status-msg-wrap { display: none; }
Remove showing post with label using css

Step 4. Click on Save template.

That's it!

You have successfully removed Status message from your blog. For any issues related to above Tutorial Please Comment Below. Stay Updated, Browse Howbloggerz ! :)

How to Change "Showing posts with label ... Show all posts"

Step 1 - Step 3. Same as in Option 1 above.

Step 4. Replace the Removed Code with this code:

    <b:includable id='status-message'>
      <b:if cond='data:navMessage'>
      <div class='status-msg-wrap'>
        <div class='status-msg-body'>
          <b:if cond='data:blog.pageType == "index"'>
          <b:if cond='data:blog.searchLabel'>
            Posts with the label <b><data:blog.searchLabel/></b>
          </b:if>
          <b:if cond='data:blog.searchQuery'>
            Search results for <b><data:blog.searchQuery/></b>
          </b:if>
          <b:else/>
          <data:navMessage/>
          </b:if>
        </div>
        <div class='status-msg-border'>
          <div class='status-msg-bg'>
            <div class='status-msg-hidden'><data:navMessage/></div>
          </div>
        </div>
      </div>
      <div style='clear: both;'/>
      </b:if>
    </b:includable>

Step 5. Configuration of Message (Optional):

  • Replace the text in bold green with your own text for label message
    Here <b><data:blog.searchLabel/></b> is the Searched label.
    For eg: "Showing posts related to <b><data:blog.searchLabel/></b>" and this will be show as:
    "Showing posts related to YourLabel".
  • Replace the text in Bold Blue with your own text for searched query message
    Here <b><data:blog.searchQuery/></b> is the search query.
    For eg: "Showing results for query <b><data:blog.searchQuery/></b>" and this will be shown as:
    "Showing results for query YourQuery".
edit, change or re-format showing post with label message

Step 6. Click on Save Template.

Read: Top Stylish Search Boxes for blogger

Done!

Now click on label link or make any search on your blog, you will see your custom message at the top of the page. For any issues related to above Tutorial Please Comment Below. Stay Updated, Browse Howbloggerz ! :)

Read more ...

Saturday, 13 February 2016

4 Stylish Email Subscription Widgets For Blogger

Updated on: August 27, 2016

Email subscription widget is a subscription form for blogger sidebar provided by feedburner, this widget help your interested visitors to get latest updates from your blog via e-mail. People just enter their email address and then click on the "Subscribe" button and then, they would get all your blog's updates right on their email's Inbox. These widgets not only increase your traffic but also helps you to grow a loyal community of readers.

Benefits Of Email Subscription Widget

Email Subscription box is also considered as the best ways to promote a website. Subscription widget help you in creating an active community of readers and boost your blog traffic. More traffic = More AdSense earning. This widget help you to deliver latest posts to your customers instantaneously via Email, and the best part of this widget is that you will get social media links free in it which are going to help you to connect with your customers via social media channels.

How To Add Email Subscription Widget To Blogger

Even blogger provide the Email subscription widget for blogger but that was not as much appealing as a custom stylish email subscription box with social media integration. Custom email subscription widget provide email subscription service as well as social media service. Here are some best subscription widgets for blogger, so choose according to the design of your blog and follow the steps given below:

Stylish email subscription widget for blogger
<style type="text/css">
.hbzsignup-form {
    background: transparent url("https://1.bp.blogspot.com/-Y_e_B9KzB-c/Vr6fNXna_BI/AAAAAAAAALo/dk3TFDW2-4I/s1600/Email-bg.jpg") no-repeat scroll center center / 250px 150px;
    height: 150px;
    width: 250px;
    margin: 10px auto 60px auto;
}

.hbzform-inner p {
    text-align: center;
    color: #fff;
    padding: 10px;
    font: bold 18px "trebuchet MS","Tahoma";
}

.hbzemailform {
    margin: 120px auto 5px;
    width: 215px;
}

#hbzemailbox {
    background: #FEFEFE none repeat scroll 0% 0%;
    border: medium none;
    font: 12px/12px "HelveticaNeue",Helvetica,Arial,sans-serif;
    margin-right: 5px;
    box-shadow: 0px 0px 4px rgb(207, 207, 207) inset, 1px 1px 1px rgb(186, 186, 186);
    padding: 7px;
    box-sizing: content-box;
    height: 12px;
    vertical-align: top;
    display: inline-block;
}
#hbzemailbutton {
    background: transparent linear-gradient(to bottom, rgb(202, 48, 40) 0%, rgb(235, 88, 78) 100%) repeat scroll 0% 0%;
    box-shadow: 0px 0px 2px rgb(182, 37, 32) inset;
    border: medium none;
    color: #FFF;
    cursor: pointer;
    font: 13px/13px "HelveticaNeue",Helvetica,Arial,sans-serif;
    padding: 6px;
    border-radius: 5px;
    height: 27px;
    display: inline-block;
}

#hbzemailbutton:hover {
    background: transparent linear-gradient(to bottom, #CA3028 0%, #B72420 100%) repeat scroll 0% 0%;
}

.hbzsocial-icons {
    margin: 20px 0 0;
    overflow: hidden;
    display: block;
    text-align: center;
}

.hbzsocial-icons ul {
    display: inline-block;
    margin: 0 auto !important;
    text-align: center;
    padding: 0px
}

.hbzsocial-icons ul li {
    background: transparent !important;
    border: none !important;
    float: left;
    list-style-type: none !important;
    margin: 0 4px 10px !important;
    padding: 0 !important;
}

.hbzsocial-icons ul li::before,
.hbzsocial-icons ul li::after {
    display: none !important;
}

.hbzsocial-icons ul li a, .hbzsocial-icons ul li a:hover {
    background: url("https://blogger.googleusercontent.com/img/b/R29vZ2xl/AVvXsEhYio4WG2f506TKSK7Y9znDcmB6ywLN7gY1D0EyiPYwTRDdDj3Lr56whoSP4Fm7xdOemPLbXYZ7UHIx9AYljYeSnx7XTp3kfDtNeeBCi3jHMB7wD5-rk-JzPmMtC2ofIW3JmNF6Whe0jcLU/s1600/sprite_32x32.png") no-repeat scroll 0 0;
    -moz-border-radius: 50%;
    -webkit-border-radius: 50%;
    border-radius: 50%;
    display: block;
    height: 38px;
    overflow: hidden;
    text-indent: -999px;
    transition: all 0.25s linear 0s; width: 38px;
}

.hbzsocial-icons ul li.social-facebook a {
    background-color: #3b5998;
    background-position: -60px 3px;
}

.hbzsocial-icons ul li.social-twitter a {
    background-color: #00aced;
    background-position: -253px 3px;
}

.hbzsocial-icons ul li.social-gplus a {
    background-color: #dd4b39;
    background-position: -93px 3px;
}

.hbzsocial-icons ul li.social-pinterest a {
    background-color: #cb2027;
    background-position: -157px 3px;
}

.hbzsocial-icons ul li.social-rss a {
    background-color: #F87E12;
    background-position: -189px 3px;
}
.hbzsocial-icons ul li a:hover {
    background-color: #333;
}

.hbzsocial-like {
    display: block;
    text-align: center;
}

.hbzsocial-like tbody, .hbzsocial-like tbody tr {
    display: block;
}

.hbzfb-likes {
    display: inline-block;
    padding-bottom: 15px;
    margin-right: 5px;
}

.hbztw-follow {
    display: inline
}

</style>

<div>
 <div class='hbzsignup-form'>
  <div class='hbzform-inner'>
   <p>Sign Up for Email Updates</p>
  </div>
  <div class='hbzemailform'>
   <form action='http://feedburner.google.com/fb/a/mailverify' id='subscribe' method='post' onsubmit='window.open(&apos;http://feedburner.google.com/fb/a/mailverify?uri=[Your Blog uri]&apos;, &apos;popupwindow&apos;, &apos;scrollbars=yes,width=550,height=520&apos;);return true' target='popupwindow'>
    <input name='uri' type='hidden' value='[Your Blog uri]'/>
    <input name='loc' type='hidden' value='en_US'/>
    <input id='hbzemailbox' name='email' required='' type='text' placeholder='Enter your email...'/>
    <input id='hbzemailbutton' title='' type='submit' value='Sign up'/>
   </form>
  </div>
 </div>

 <div class="hbzsocial-icons">
  <ul>
   <li class="social-facebook"><a href="[Fb url]" target="_blank" title="Facebook">Facebook</a></li>
   <li class="social-twitter"><a href="[Twitter url]" target="_blank" title="Twitter">Twitter</a></li>
   <li class="social-gplus"><a href="[Google+ url]" target="_blank" title="Google+">Google+</a></li>
   <li class="social-pinterest"><a href="[Pinterest url]" target="_blank" title="Pinterest">Pinterest</a></li>
   <li class="social-rss"><a href="[RSS url]" target="_blank" title="RSS">RSS</a></li>
  </ul>
 </div>

 <table class='hbzsocial-like'>
  <tbody>
   <tr>
    <td class='hbzfb-likes'>
     <div id="fb-root">
     </div>
     <script>(function(d, s, id) {
  var js, fjs = d.getElementsByTagName(s)[0];
  if (d.getElementById(id)) return;
  js = d.createElement(s); js.id = id;
  js.src = "//connect.facebook.net/en_US/sdk.js#xfbml=1&version=v2.4";
  fjs.parentNode.insertBefore(js, fjs);
}(document, 'script', 'facebook-jssdk'));
     </script>
     <div class="fb-like" data-href="[Fb url]" data-layout="button_count" data-action="like" data-show-faces="false" data-share="false">
     </div>
    </td>
    <td class='hbztw-follow'>
     <a href="[Twitter url]" class="twitter-follow-button" data-show-count="true" data-show-screen-name="false" data-dnt="true">Follow @[Twitter Username]</a>
     <script>!function(d,s,id){var js,fjs=d.getElementsByTagName(s)[0],p=/^http:/.test(d.location)?'http':'https';if(!d.getElementById(id)){js=d.createElement(s);js.id=id;js.src=p+'://platform.twitter.com/widgets.js';fjs.parentNode.insertBefore(js,fjs);}}(document, 'script', 'twitter-wjs');
     </script>
    </td>
   </tr>
  <tbody>
 </table>
</div>
Stylish email subscription form with social media for blogger
<style type="text/css">
.hbzsub {
    background-color: #1E293B;
    width: 100%;
    height: 100%;
    box-shadow: 0px 0px 10px rgb(30, 41, 59);
}

.hbzemailform {
    width: 239px;
    margin: 10px auto;
}

.hbzform-inner h4 {
    color: rgb(255, 255, 255);
    text-align: center;
    padding: 10px;
    font: bold 18px/40px "trebuchet MS","Tahoma";
}

#hbzemailbox {
    background-color: #FFF;
    border: 1px solid #FFF;
    border-radius: 7px 0px 0px 7px;
    height: 20px;
    padding: 6px;
    box-sizing: content-box;
}

#hbzemailbutton {
    background-color: #F0553B;
    border: 1px solid #F0553B;
    color: #FFF;
    height: 34px;
    border-radius: 0px 7px 7px 0px;
    margin-left: -4px;
    font-weight: 600;
    cursor: pointer;
}

#hbzemailbutton:hover {
    background-color: #1E293B;
    border: 1px solid #FFF;
    box-shadow: 0 0 5px #ddd;
}

.hbzsocial-like {
    background: transparent url("https://3.bp.blogspot.com/-2hqsqwGQg2M/VsCLsiFb2sI/AAAAAAAAAMY/7jkBsN8tVIg/s1600/Facebook-twitter-rectangle.png") no-repeat scroll center center / 250px 157px;
    width: 250px;
    height: 120px;
    margin: 10px auto;
}

.hbzfb-likes {
    margin-top: 90px;
    margin-left: 20px;
    position: absolute;
    display: block;
    box-shadow: 0px 0px 10px rgba(9, 42, 87, 0.73);
}

.hbztw-follow {
    display: block;
    margin-left: 152px;
    position: absolute;
    margin-top: 89px;
    box-shadow: 0 0 10px rgba(2, 81, 173, 0.59);
    height: 20px;
}
</style>

<div class="hbzsub">
 <div class='hbzsignup-form'>
  <div class='hbzform-inner'>
   <h4>Get Posts In Your Inbox</h4>
  </div>
  <div class='hbzemailform'>
   <form action='http://feedburner.google.com/fb/a/mailverify' id='subscribe' method='post' onsubmit='window.open(&apos;http://feedburner.google.com/fb/a/mailverify?uri=[Your Blog uri]&apos;, &apos;popupwindow&apos;, &apos;scrollbars=yes,width=550,height=520&apos;);return true' target='popupwindow'>
    <input name='uri' type='hidden' value='[Your Blog uri]'/>
    <input name='loc' type='hidden' value='en_US'/>
    <input id='hbzemailbox' name='email' required='' type='text' placeholder='Enter Your Email Here...'/>
    <input id='hbzemailbutton' title='' type='submit' value='Subscribe'/>
   </form>
  </div>
 </div>
<table class='hbzsocial-like'>
  <tbody>
   <tr>
    <td class='hbzfb-likes'>
     <div id="fb-root">
     </div>
     <script>(function(d, s, id) {
  var js, fjs = d.getElementsByTagName(s)[0];
  if (d.getElementById(id)) return;
  js = d.createElement(s); js.id = id;
  js.src = "//connect.facebook.net/en_US/sdk.js#xfbml=1&version=v2.4";
  fjs.parentNode.insertBefore(js, fjs);
}(document, 'script', 'facebook-jssdk'));
     </script>
     <div class="fb-like" data-href="[Fb url]" data-layout="button_count" data-action="like" data-show-faces="false" data-share="false">
     </div>
    </td>
    <td class='hbztw-follow'>
     <a href="[Twitter url]" class="twitter-follow-button" data-show-count="false" data-show-screen-name="false" data-dnt="true">Follow @[Twitter Username]</a>
     <script>!function(d,s,id){var js,fjs=d.getElementsByTagName(s)[0],p=/^http:/.test(d.location)?'http':'https';if(!d.getElementById(id)){js=d.createElement(s);js.id=id;js.src=p+'://platform.twitter.com/widgets.js';fjs.parentNode.insertBefore(js,fjs);}}(document, 'script', 'twitter-wjs');
     </script>
    </td>
   </tr>
  </tbody>
 </table>
</div>
Custom emaill subscription widget for blogger with social media integration
<style type="text/css">
.hbzsub {
    background-color: rgb(87, 98, 105);
    width: 100%;
    height: 100%;
    padding: 5px;
    box-shadow: 0px 0px 5px rgb(87, 98, 105);
}

.hbzform-inner {
    text-align: center;
    color: rgb(255, 255, 255);
    font: bold 16px "trebuchet MS","Tahoma";
}

.hbzemailform {
    width: 240px;
    margin: 10px auto;
}

#hbzemailbox {
    background-color: #798187;
    color: #FFF;
    width: 208px;
    border: 1px solid #697780;
    padding: 15px;
    text-align: center;
    height: 18px;
    box-sizing: content-box;
}

#hbzemailbutton {
    background-color: rgb(243, 93, 92);
    border: 1px solid rgb(215, 84, 83);
    color: rgb(255, 255, 255);
    width: 240px;
    font: bold 16px "trebuchet MS","Tahoma";
    padding: 15px;
    text-align: center;
    height: 50px;
    margin: 10px auto;
    cursor: pointer;
}

#hbzemailbutton:hover {
    background-color: #E64C4B;
    border: 1px solid #BF4A49;
}

.hbzsignup-form {
    margin-top: 15px;
}

.hbzsocial-icons {
    overflow: hidden;
    text-align: center;
    border-bottom: 1px solid rgb(133, 133, 133);
    width: 230px;
    display: block;
    margin: 20px auto;
}

.hbzsocial-icons ul {
    margin: 0px auto !important;
    text-align: center;
    padding: 0px !important;
    display: inline-block;
}

.hbzsocial-icons ul li {
    background: transparent none repeat scroll 0% 0% !important;
    border: medium none !important;
    float: left;
    list-style-type: none !important;
    padding: 0px !important;
    margin: 0px 2px !important;
}

.hbzsocial-icons ul li::before,
.hbzsocial-icons ul li::after {
    display: none !important;
}

.hbzsocial-icons ul li a, .hbzsocial-icons ul li a:hover {
    background: url("https://blogger.googleusercontent.com/img/b/R29vZ2xl/AVvXsEhYio4WG2f506TKSK7Y9znDcmB6ywLN7gY1D0EyiPYwTRDdDj3Lr56whoSP4Fm7xdOemPLbXYZ7UHIx9AYljYeSnx7XTp3kfDtNeeBCi3jHMB7wD5-rk-JzPmMtC2ofIW3JmNF6Whe0jcLU/s1600/sprite_32x32.png") no-repeat scroll 0 0;
    -moz-border-radius: 50%;
    -webkit-border-radius: 50%;
    border-radius: 50%;
    display: block;
    height: 34px;
    overflow: hidden;
    text-indent: -999px;
    transition: all 0.25s linear 0s;
    width: 34px;
}

.hbzsocial-icons ul li.social-facebook a {
    background-position: -62px 1px;
}

.hbzsocial-icons ul li.social-facebook a:hover {
    background-color: #3b5998;
}

.hbzsocial-icons ul li.social-twitter a {
    background-position: -254px 1px;
}

.hbzsocial-icons ul li.social-twitter a:hover {
    background-color: #00aced;
}

.hbzsocial-icons ul li.social-gplus a {
    background-position: -95px 0px;
}

.hbzsocial-icons ul li.social-gplus a:hover {
    background-color: #dd4b39;
}

.hbzsocial-icons ul li.social-pinterest a {
    background-position: -159px 1px;
}

.hbzsocial-icons ul li.social-pinterest a:hover {
    background-color: #cb2027;
}

.hbzsocial-icons ul li.social-rss a {
    background-position: -190px 0px;
}

.hbzsocial-icons ul li.social-rss a:hover {
    background-color: #F87E12;
}

</style>

<div class="hbzsub">

<div class="hbzsocial-icons">
  <ul>
   <li class="social-facebook"><a href="[Fb url]" target="_blank" title="Facebook">Facebook</a></li>
   <li class="social-twitter"><a href="[Twitter url]" target="_blank" title="Twitter">Twitter</a></li>
   <li class="social-gplus"><a href="[Google+ url]" target="_blank" title="Google+">Google+</a></li>
   <li class="social-pinterest"><a href="[Pinterest url]" target="_blank" title="Pinterest">Pinterest</a></li>
   <li class="social-rss"><a href="[RSS url]" target="_blank" title="RSS">RSS</a></li>
  </ul>
 </div>

 <div class='hbzsignup-form'>
  <div class='hbzform-inner'>
   <h4>Subscribe to my Newsletter</h4>
  </div>
  <div class='hbzemailform'>
   <form action='http://feedburner.google.com/fb/a/mailverify' id='subscribe' method='post' onsubmit='window.open(&apos;http://feedburner.google.com/fb/a/mailverify?uri=[Your Blog uri]&apos;, &apos;popupwindow&apos;, &apos;scrollbars=yes,width=550,height=520&apos;);return true' target='popupwindow'>
    <input name='uri' type='hidden' value='[Your Blog uri]'/>
    <input name='loc' type='hidden' value='en_US'/>
    <input id='hbzemailbox' name='email' required='' type='text' placeholder='Your Email'/>
    <input id='hbzemailbutton' title='' type='submit' value='Subscribe'/>
   </form>
  </div>
 </div>
</div>
Stylish email subscription box
<style type="text/css">
    .hbzsub {
        background-color: rgb(255, 255, 255);
        width: 100%;
        height: 100%;
        border: 1px dashed #ddd;
    }
   
    .hbzsube {
        color: rgb(255, 255, 255);
        background-color: rgb(11, 172, 227);
        padding: 10px 0;
        text-align: center;
        font: bold 15px "trebuchet MS", "Tahoma";
        width: 100%;
    }
   
    .hbzemailform {
        width: 235px;
        margin: 10px auto;
    }
   
    #hbzemailbox {
        background-color: #FFF;
        color: #747474;
        width: 130px;
        border: 1px solid #D8D8D8;
        padding: 7px;
        height: 18px;
        display: inline-block;
        vertical-align: top;
        box-shadow: inset 0px 0px 5px #c2c2c2;
        box-sizing: content-box;
        font-size: 13px;
    }
   
    #hbzemailbutton {
        background-color: rgb(243, 93, 92);
        border: 1px solid rgb(215, 84, 83);
        color: rgb(255, 255, 255);
        width: 85px;
        font: bold 13px "trebuchet MS", "Tahoma";
        padding: 7px;
        text-align: center;
        cursor: pointer;
        display: inline-block;
        height: 34px;
    }
   
    #hbzemailbutton:hover {
        background-color: #E64C4B;
        border: 1px solid #BF4A49;
    }
   
    .hbzsignup-form {
        margin-top: 15px;
    }
   
    .hbzsocial-icons {
        overflow: hidden;
        text-align: center;
        display: block;
        margin: 20px auto;
    }
   
    .hbzsocial-icons ul {
        margin: 0px auto !important;
        text-align: center;
        padding: 0px !important;
        display: inline-block;
    }
   
    .hbzsocial-icons ul li {
        background: transparent none repeat scroll 0% 0% !important;
        border: medium none !important;
        float: left;
        list-style-type: none !important;
        padding: 0px !important;
        margin: 0px 5px !important;
    }
   
    .hbzsocial-icons ul li::before,
    .hbzsocial-icons ul li::after {
        display: none !important;
    }
   
    .hbzsocial-icons ul li a {
        background: url("https://blogger.googleusercontent.com/img/b/R29vZ2xl/AVvXsEhYio4WG2f506TKSK7Y9znDcmB6ywLN7gY1D0EyiPYwTRDdDj3Lr56whoSP4Fm7xdOemPLbXYZ7UHIx9AYljYeSnx7XTp3kfDtNeeBCi3jHMB7wD5-rk-JzPmMtC2ofIW3JmNF6Whe0jcLU/s1600/sprite_32x32.png") no-repeat scroll 0 0;
        -moz-border-radius: 50%;
        -webkit-border-radius: 50%;
        display: block;
        height: 34px;
        overflow: hidden;
        text-indent: -999px;
        transition: all 0.25s linear 0s;
        width: 34px;
    }
   
    .hbzsocial-icons ul li a:hover {
        background-color: #aeaeae !important;
    }
   
    .hbzsocial-icons ul li.social-facebook a {
        background-position: -62px 1px;
        background-color: #3b5998;
    }
   
    .hbzsocial-icons ul li.social-twitter a {
        background-position: -254px 1px;
        background-color: #00aced;
    }
   
    .hbzsocial-icons ul li.social-gplus a {
        background-position: -95px 0px;
        background-color: #dd4b39;
    }
   
    .hbzsocial-icons ul li.social-pinterest a {
        background-position: -159px 1px;
        background-color: #cb2027;
    }
   
    .hbzsocial-icons ul li.social-rss a {
        background-position: -190px 0px;
        background-color: #F87E12;
    }
</style>
<div class="hbzsub">
    <div class="hbzsube">Join Our Free Newsletter</div>
    <div class='hbzsignup-form'>
        <div class='hbzemailform'>
            <form action='http://feedburner.google.com/fb/a/mailverify' id='subscribe' method='post' onsubmit='window.open(&apos;http://feedburner.google.com/fb/a/mailverify?uri=[Your Blog uri]&apos;, &apos;popupwindow&apos;, &apos;scrollbars=yes,width=550,height=520&apos;);return true' target='popupwindow'> <input name='uri' type='hidden' value='[Your Blog uri]' /> <input name='loc' type='hidden' value='en_US' /> <input id='hbzemailbox' name='email' required='' type='text' placeholder='Your Email address' /> <input id='hbzemailbutton' title='' type='submit' value='Join Us' /> </form>
        </div>
        <div class="hbzsube">Sociliaze with Us</div>
        <div class="hbzsocial-icons">
            <ul>
                <li class="social-facebook"><a href="[Fb url]" target="_blank" title="Facebook">Facebook</a></li>
                <li class="social-twitter"><a href="[Twitter url]" target="_blank" title="Twitter">Twitter</a></li>
                <li class="social-gplus"><a href="[Google+ url]" target="_blank" title="Google+">Google+</a></li>
                <li class="social-pinterest"><a href="[Pinterest url]" target="_blank" title="Pinterest">Pinterest</a></li>
                <li class="social-rss"><a href="[RSS url]" target="_blank" title="RSS">RSS</a></li>
            </ul>
        </div>
        <div style="width: 230px; margin: 0px auto;">
            <div id="fb-root"></div>
            <script>
                (function(d, s, id) {
                    var js, fjs = d.getElementsByTagName(s)[0];
                    if (d.getElementById(id)) return;
                    js = d.createElement(s);
                    js.id = id;
                    js.src = "//connect.facebook.net/en_GB/sdk.js#xfbml=1&version=v2.6";
                    fjs.parentNode.insertBefore(js, fjs);
                }(document, 'script', 'facebook-jssdk'));
            </script>
            <div class="fb-page" data-href="[Fb url]" data-width="230" data-small-header="true" data-adapt-container-width="true" data-hide-cover="false" data-hide-cover="true" data-show-facepile="true">
                <div class="fb-xfbml-parse-ignore">
                    <blockquote cite="[Fb url]"><a href="[Fb url]">[Fb Page Name]</a></blockquote>
                </div>
            </div>
        </div>
    </div>
</div>

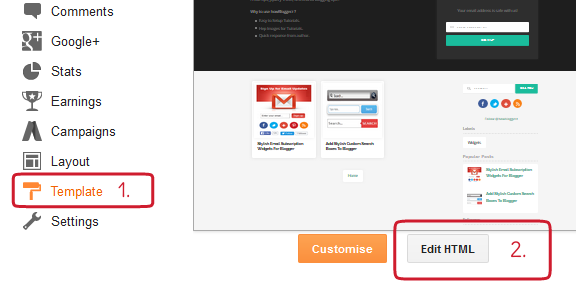
Steps: How To Add a Stylish Subscription Widget To Blogger

Step 1. Log in to your Blogger account, then go to Layout > click on the 'Add a gadget' link on the left side.

Step 2. Choose HTML/JavaScript from the pop-up window > paste the code of the subscription widget inside the empty box.

Add HTML/JavaScript widget

Step 3. Configuration of Subscription Box.

  • Replace [Your Blog uri] with Your blog Uri which is basically your Feed title. You can get it by visiting http://feedburner.google.com and then navigate to Publicize > Email Subscription and find your uri value in given box. For eg: http://feedburner.google.com/fb/a/mailverify?uri=Howbloggerz and <input name='uri' type='hidden' value='Howbloggerz'/>
  • Replace [Fb url] with your Facebook page URL. For eg: https://www.facebook.com/howbloggerz
  • Replace [Twitter url] with your twitter page URL. For eg: http://www.twitter.com/howbloggerz
  • Replace  [Google+ url] with your google+ page or account URL. For eg: https://plus.google.com/101438893480071463583
  • Replace [RSS url] with your RSS URL. For eg: http://feeds.feedburner.com/howbloggerz
  • Replace [Pinterest url] with your pinterest URL.
  • Replace [Twitter Username] with your twitter account username. For eg : @Howbloggerz
  • Replace [Fb Page Name] with your Facebook Page Name. For eg : Howbloggerz

Note: Minimum Sidebar width required - 230px.

Read: How to Change Email Subscription Delivery Time

Step 4. Press Save.

Enjoy !

Now visitors of your blog will be able to subscribe your blog easy by using Subscription widget. For any issues related to above Subscription boxes Please Comment Below. More Subscription widgets will be added soon. Stay Updated, Browse Howbloggerz ! :)

Read more ...

Monday, 8 February 2016

5 Stylish Search Boxes For Blogger (with Demo)

Updated on: August 27, 2016
Custom Stylish Search box widget
Search boxes for blogger

Search Box is the basic but a necessary part of a website. They're user convenient and help you in increasing your website usability. They help your readers to navigate throughout your blog more efficiently. You would see that every blogspot blogger has different stylish custom search box widget matching their template design because, they were not only help users to find the solution of their problems more easily but also add a professional look to your blog.

Whereas Web crawlers like Google can crawl your entire site easily to index all of your posts and pages, visitors have only access to the links that are in front of them. You may have hundreds or more posts/pages for people to read. You may have a different category, labels, tag, related posts, etc. listed on each of your pages, but you cannot provide all of your data in a single page. For people to find what they are looking for, they need to be able to search through your entire content quickly and easily.

Whichever page a visitor lands on, they can search for what they want. This allows people to get access to some of your hidden content that would take much longer to find by clicking through countless pages or posts. The easier it is for people to navigate your whole blog, the more likely they will stay and visit again as they can switch away to another, increasing your bounce rate.

Custom Search Boxes For Blogger

Just adding a Search Bar is not enough, it should always be ready to help customers and reliable according to the theme of your blog. Blogger also provides Officially Simple widget for it, but that doesn't provide the professional, stylish look to your blog, but you can use CSS to Style blogspot official search box widget. If your old Search box is not working properly and you want to replace it with beautiful one don't worry, just pick up one of the following and follow the steps by step instructions below. The look of the design is up to you, you can also edit the CSS according to your blog needs.

Benefits of Adding Custom Stylish Search Box

  • Add professional looks to your website.
  • Provide basic benefits to customers.
  • Save user time.
  • Can be applied anywhere like in header, sidebar, footer etc.
  • Stylish Active,hover and focus effects.
  • Pure CSS, no image.
  • Easy customization from CSS styles.
  • Automatically adjust width.
Custom Beautiful Stylish Blue Grey Search box widget
<style type="text/css">
    #hbz-searchbox {
        background-color: #F5F5F5;
        border: 1px solid #EDEDED;
        padding: 5px;
        border-radius: 10px;
        margin: 10px auto;
        min-width: 238px;
        max-width: 288px;
    }
   
    #hbz-input {
        background-color: #FEFEFE;
        border: medium none;
        font: 12px/12px "HelveticaNeue", Helvetica, Arial, sans-serif;
        margin-right: 2%;
        padding: 4%;
        box-shadow: 2px 1px 4px #999999 inset;
        border-radius: 9px;
        width: 60.33%;
    }
   
    #hbz-input:focus {
        outline: medium none;
        box-shadow: 1px 1px 4px #0D76BE inset;
    }
   
    #hbz-submit {
        background: transparent linear-gradient(to bottom, #34ADEC 0%, #2691DC 100%) repeat;
        border-radius: 9px;
        border: medium none;
        color: #FFF;
        cursor: pointer;
        font: 13px/13px "HelveticaNeue", Helvetica, Arial, sans-serif;
        padding: 4%;
        width: 28%;
    }
   
    #hbz-submit:hover {
        background: transparent linear-gradient(to bottom, #2691DC 0%, #34ADEC 100%) repeat;
    }
</style>

<form id="hbz-searchbox" action="/search" method="get">
    <input type="text" id="hbz-input" name="q" placeholder="Type Here..." />
    <input type="hidden" name="max-results" value="8" />
    <input id="hbz-submit" type="submit" value="Search" />
</form>
Beautiful Stylish Red Grey Search box widget
<style type="text/css">
    #hbz-searchbox {
        min-width: 250px;
        margin: 10px auto;
        border-radius: 3px;
        overflow: hidden;
        max-width: 300px;
    }
   
    #hbz-input {
        width: 59.2%;
        padding: 10.5px 4%;
        font: bold 15px "lucida sans", "trebuchet MS", "Tahoma";
        border: none;
        background-color: #EEE;
    }
   
    #hbz-input:focus {
        outline: none;
        background-color: #FFF;
        box-shadow: 0 0 2px #333333 inset;
    }
   
    #hbz-submit {
        overflow: visible;
        position: relative;
        float: right;
        border: none;
        padding: 0;
        cursor: pointer;
        height: 40px;
        width: 32.8%;
        font: bold 15px/40px "lucida sans", "trebuchet MS", "Tahoma";
        color: #FFF;
        text-transform: uppercase;
        background-color: #D83C3C;
    }
   
    #hbz-submit::before {
        content: "";
        position: absolute;
        border-width: 8px;
        border-style: solid solid solid none;
        border-color: transparent #D83C3C;
        top: 12px;
        left: -6px;
    }
   
    #hbz-submit:focus,
    #hbz-submit:active {
        background-color: #C42F2F;
        outline: none;
    }

    #hbz-submit:focus::before,
    #hbz-submit:active::before {
        border-color: transparent #C42F2F;
    }

    #hbz-submit:hover {
        background-color: #E54040;
    }

    #hbz-submit:hover::before {
        border-color: transparent #E54040;
}
</style>

<form id="hbz-searchbox" action="/search" method="get">
    <input type="text" id="hbz-input" name="q" placeholder="Search..." />
    <input type="hidden" name="max-results" value="8" />
    <button id="hbz-submit" type="submit">Search</button>
</form>
Animated Green color Stylish Search box widget
<style type="text/css">
    #hbz-searchbox {
        background: transparent linear-gradient(#2C2C2C, #111);
        border-width: 1px;
        border-style: solid;
        border-color: #000;
        border-radius: 4px;
        padding: 10px;
        z-index: 1;
        display: block;
        margin: 10px auto;
        min-width: 228px;
        max-width: 278px;
    }
   
    #hbz-input,
    .hbz-submit {
        box-shadow: 0 2px #000;
        font-family: 'Cabin', helvetica, arial, sans-serif !important;
        margin: 0px;
        padding: 0px;
    }
   
    #hbz-input {
        background: linear-gradient(#333, #222);
        border: 1px solid #444;
        color: #888;
        display: block;
        float: left;
        font-size: 13px;
        height: 30px;
        padding-left: 4%;
        padding-right: 4%;
        width: 60.2%;
        border-radius: 3px 0px 0px 3px;
    }
   
    #hbz-input:focus {
        animation: glow 800ms ease-out infinite alternate;
        border-color: #393;
        color: #efe;
        outline: none;
    }
   
    .hbz-submit {
        background: linear-gradient(#333, #222);
        box-sizing: content-box;
        border: 1px solid #444;
        border-left-color: #000;
        color: #fff;
        display: block;
        font-size: 12px;
        height: 30px;
        line-height: 30px;
        position: relative;
        width: 30%;
        cursor: pointer;
        border-radius: 0px 3px 3px 0px;
    }
   
    .hbz-submit:hover,
    .hbz-submit:focus {
        background: linear-gradient(#393939, #292929);
    }
   
    .hbz-submit:hover,
    .hbz-submit:focus {
        color: #5f5;
        outline: none;
    }
   
    .hbz-submit:active {
        top: 1px;
    }
   
    @keyframes glow {
        0% {
            border-color: #393;
            box-shadow: 0 2px #000, 0px 0px 5px #3DAD3D, inset 0px 0px 5px #1F391F;
        }
        100% {
            border-color: #6f6;
            box-shadow: 0 2px #000, 0px 0px 8px #6bab6b, inset 0px 0px 10px #1F391F;
</style>

<form id="hbz-searchbox" action="/search" method="get">
    <input type="text" id="hbz-input" name="q" placeholder="Search..." />
    <input type="hidden" name="max-results" value="8" />
    <button class="hbz-submit" type="submit">Search</button>
</form>
Custom Stylish Search box widget with hover effect
<style type="text/css">
    #hbz-searchbox {
        height: 40px;
        position: relative;
        min-width: 250px;
        max-width: 300px;
        margin: 10px auto;
    }
   
    .hbz-buttonwrap {
        border: none;
        width: 14%;
        height: 35px;
        display: block;
        position: absolute;
        top: 0;
        right: 0;
        background: #009bff;
        cursor: pointer;
        border-bottom: 5px solid #0276c1;
    }
   
    .hbz-buttonwrap:hover {
        border-bottom: 5px solid #bc490a;
        background: #d75813;
    }
   
    .hbz-submit {
        width: 35px;
        height: 35px;
        background: transparent;
        cursor: pointer;
        position: absolute;
        right: 50%;
        top: 50%;
        margin-top: -17.5px;
        margin-right: -17.5px;
        border: none;
    }
   
    .hbz-submit:after {
        content: '';
        position: absolute;
        width: 8px;
        height: 8px;
        border: 2px solid white;
        border-radius: 50%;
        left: 10px;
        top: 9px;
        box-sizing: content-box;
    }
   
    .hbz-submit:before {
        content: '';
        position: absolute;
        height: 8px;
        width: 2px;
        background: white;
        transform: rotate(-35deg);
        top: 19px;
        left: 21px;
    }
   
    #hbz-input {
        height: 32px;
        width: 82%;
        position: absolute;
        padding-left: 4%;
        border: none;
        outline: none;
        right: 14%;
        border-bottom: 5px solid #bbb;
        border-left: 1px solid #eaeaea;
        background-color: #fbfbfb;
        border-top: 1px solid #eaeaea;
        box-shadow: 1px 1px 2px #e9e4e4 inset;
    }
   
    #hbz-input:focus,
    #hbz-input:active {
        background-color: #fff;
    }
</style>

<form action="/search" id="hbz-searchbox" method="get">
    <span class="hbz-buttonwrap"><button class="hbz-submit" value="" type="submit"></button></span>
    <input type="text" name="q" id="hbz-input" placeholder="Type here ..." />
    <input type="hidden" name="max-results" value="8" />
</form>
beautiful Smooth Stylish Search box widget
<style type="text/css">
    #hbz-searchbox {
        height: 35px;
        margin: 10px auto;
        position: relative;
        min-width: 250px;
        max-width: 300px;
    }
   
    .hbz-buttonwrap {
        border: none;
        width: 14%;
        height: 35px;
        display: block;
        position: absolute;
        top: 0;
        right: 0;
        background: #444;
        cursor: pointer;
        border-top-right-radius: 5px;
        border-bottom-right-radius: 5px;
    }
   
    .hbz-buttonwrap:hover {
        background: #1a1a1a;
    }
   
    .hbz-submit {
        width: 35px;
        height: 35px;
        background: transparent;
        cursor: pointer;
        position: absolute;
        right: 50%;
        top: 50%;
        margin-top: -17.5px;
        margin-right: -17.5px;
        border: none;
    }
   
    .hbz-submit:after {
        content: '';
        position: absolute;
        width: 8px;
        height: 8px;
        border: 2px solid white;
        border-radius: 50%;
        left: 10px;
        top: 9px;
        box-sizing: content-box;
    }
   
    .hbz-submit:before {
        content: '';
        position: absolute;
        height: 8px;
        width: 2px;
        background: white;
        transform: rotate(-35deg);
        top: 19px;
        left: 21px;
    }
   
    #hbz-input {
        height: 35px;
        width: 82%;
        padding: 0px;
        padding-left: 4%;
        border: none;
        outline: none;
        position: absolute;
        right: 14%;
        box-shadow: inset 0 2px 2px #080808;
        background-color: #444444;
        color: #fff;
        border-top-left-radius: 5px;
        border-bottom-left-radius: 5px;
        transition: all 0.5s;
    }
   
    #hbz-input:hover,
    #hbz-input:focus {
        box-shadow: inset 1px 1px 10px #000;
    }
</style>

<form action="/search" id="hbz-searchbox" method="get">
    <span class="hbz-buttonwrap"><button class="hbz-submit" value="" type="submit"></button></span>
    <input type="text" name="q" id="hbz-input" placeholder="Search..." />
    <input type="hidden" name="max-results" value="8" />
</form>

Steps: How To Add Stylish Search Box Widget To Blogger

Note: Minimum sidebar width required - 250px

Step 1. Login to your Blogger account, then go to Layout > click on the 'Add a gadget' link on the left side.

Step 2. Choose HTML/JavaScript from the pop-up window > paste the code inside the empty box.

Add HTML/JavaScript widget

Step 3. Configuration:

- Change the value="8" for total numbers of posts per page. Eg value="12".

Note: Make sure max-results value matches with your post limit on homepage.

Step 4. Press Save.

Read: How to Change Status message on search result page
Read: Beautiful Subscription Box widgets for blogger
Read: How to change search results order

Done !

Now your visitors can navigate your blog easily. For any issues related to above tutorial Please Comment Below. Stay Updated, Browse Howbloggerz ! :)

Video Tutorial:

Video link: https://youtu.be/Xu_wLGMYXes

Read more ...